An apron for Water Play
The WATER PLAY apron (and more)!
 R has a thing for standing at the sink and playing with the water for hours. We put the water on a trickle (we don’t want to waste water!) and she will play putting water in cups and transferring them back and forth, “washing dishes” and who knows what else!

O f course, she usually ends up soaking wet after these over seas adventures.

So I decided to make her a water proof apron for these activities.
I used a vinyl tablecloth that I found for sale at Bed Bath and Beyond (she loves “polky dots” these days), and used an Ikea long sleeve bib as a model. I just lengthened it for better coverage.
‘
I started off by making a pattern for the apron. This is something I never do, but I figured I may want to make more aprons soon!
‘
‘
THe sleeve pieces were tricky – I was kind of improvising and didn’ really know what I was doing.
The arm holes ended up being tighter than I would have liked, so I’ll have to adjust that for next time.
‘
These are my front and back pieces…
‘
And then the arms, cuffs, and pocket.
‘
Then I basically:
1) sewed the shoulder seams together of the front and back pieces
2) attached the sleeves to the arm holes
3) sewed the cuffs to the tips of the sleeves
4) sewed straight from sleeve cuff to the bottom of the apron on each side
5) sewed velcro to the back pieces for closure
6) sewed the pocket onto the front,
and lastly,
7) used store bought extra wide double fold bias tape and sewed that all around the edges.
‘
Voila!
A fun apron!
‘
I made the sleeves long so this could grow with her, so for now I end up rolling up the cuffs. But it is no biggie.
‘
This is a picture of the velcro – I made sure to put the hard/rough velcro on the side facing AWAY from R when wearing it so that it wouldn’t accidentally rub against her skin.
‘
Hope you like it – give it a try!
A simple educational activity with kids: Tracing Letters
This weekend we have been trying to get our nursery and toddler’s room painted so that the contractors can get finishing touches done. Any maybe we can actually start setting up before the baby comes!! (we’ll see!)
R was very patient, considering that we didn’t go anywhere special and she spent a lot of time entertaining herself. So I made up these tracing pages for her, because she LOVES to trace, and also loves her letters and numbers.

Feel free click on the image above to download the free, printable PDF!
Enjoy!
Nursery Project #4: Modern Wall Art
Well we are really getting down to the wire! 36 weeks and 4 days and counting!
I still have A LOT to do…I was up until 1:45am last night looking at closet organization systems for the two new kids’ rooms that are almost done (yay!). Before that I spent 2-3 hours separating all the NB, 0-3m, 3m, 3-6m, and >6m clothes and setting them up in the dresser in my room since the nursery won’t be ready for a bit. I was (and still am) exhausted!!
Anyways – the project I am currently working on is the drapes for the nursery. I should have those done today. Next I’ll either work on the drapes for R’s room or I’ll work on the mobile. We’ll see =)
I thought I’d show you some of the wall art that I made for the nursery – inspired largely by the nursery on Domestic Adventure that I showed before.
First we have the elephants:
|
|
 |

Next we have 2 versions of a “LOVE” sign that I made. Can’t decide which one I like better…thoughts?
 |
 |
Here is the second option

|

|
Lastly, here is the “name” art that I made using the graphic that I designed for the growth chart and baby announcements (also inspired by some other amazing images online):

Next step: Buy frames!
I would have liked to do white frames for all of these, but since our crib and furniture that we already have is espresso, we will go with espresso frames, and white matt board. I think this will all go on a yellow wall, so that will probably look better anyways.
I’m thinking the name will be in the middle, then one LOVE and one ELEPHANT image each on top and bottom or left and right – depending on how the furniture gets arranged in the room.
Hope you like ’em and thanks for reading.
On to sewing some tabs on some curtains….
…hhhmmmm….
with all this money I’m saving with making my own nursery things, I think I might deserve a new sew and improved sewing machine soon…
L are you reading this?
=)
Nursery Project #3: Wall decals
Thanks to the water main being replaced on my street, I have been without phone, Internet and cable for a while. It’s amazing how disconnected it makes me feel!
Well since I still have 3G on my phone I thought I’d share the 2 decals we bought for our nursery and toddler room (both from etsy).
This first one is for the gray and yellow nursery (by WhimsyWallArt on etsy):
We haven’t figured out exactly where it will go yet in relation to the furniture. Our original plan was to paint one wall gray (where the crib and glider would go) and the rest yellow. The decal will definitely go on the gray wall – just not sure if it will be behind the crib or next to it.
This second decal is for R’s new room (by evgienev on etsy):
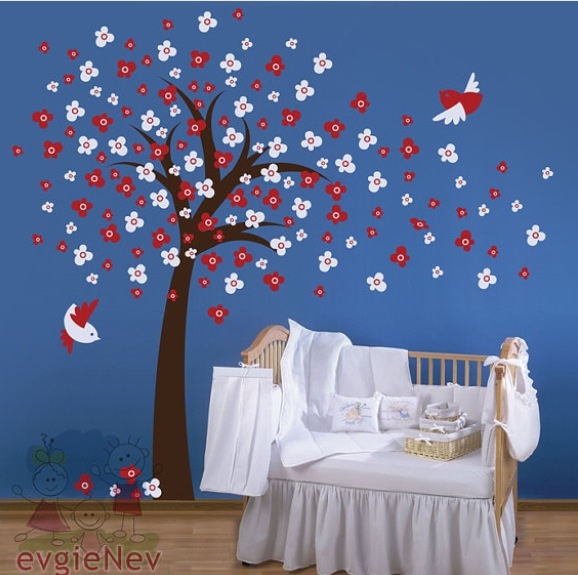
She will have one red wall (where the decal will go behind her headboard) ad the rest will be white. It’s going to be a very mod room! But definitely some whimsy too ;). We are getting the tree in dark brown as shown, then most of the flowers will be white with about 25% in yellow. But a lighter yellow than in this picture – this one is a little orangish.
More to come once I’m connected again!
Nursery Project #2: Boppy pillow redo!

I have the above “prenatal” boppy pillow that I use every night when I go to sleep. It is pretty handy now, but I remembr that with my daughter, we used it ALL the time when I was nursing her or even giving her a bottle. We ended up keeping the regular poppy on the first floor on the couch, and kept this one up in her room on the glider. It actually worked really well!
Well, thanks to some chocolate ensure explosions, our pillow cover is pretty ugly looking! (for any of you that are wondering, chocolate ensure and boost do NOT come out of clothing!)
‘
In fact they look down right gross.
Anyways, in preparation for our little man who will be joining us soon, I wanted to revamp my boppy pillow, but haven’t been able to find covers for this one. So, I decided to make one.
I also needed to fix the stuffing a bit, because after several washes it has become bumpy, lumpy and all bunched to one side.
‘
I just cut a slit in the inner pillow and rearranged the stuffing as well as added some new stuffing to soften up the particularly lumpy areas. I didn’t replace all the stuffing basically becaus I did not have enough and my trips to the store these days are limited. So I’m trying to get done as much as I can wthout having to buy more or postpone projects.
As you can see, I didn’t worry about looks when I closed up the slit – I just did a quick stitch to keep the stuffing inside!
‘
Next: I took off the current cover, and traced it on my new fabric, allowing for a 1/2 seach allowance all around. The one thing I wasn’t sure about was making a cover flap for the zipper. I have never done that before and was going to skip that part to keep the project simple. But then I realized that the only zipper I had at home that was long enough, was black. And since I didn’t think that would look great on my pretty yellow cover, I decded to try to make a flap afterall.’
On the side where the flap would be coming from, I basically cut more fabric where the zipper would be, so I would be able to fold over more of the fabric to cover the zipper (more pictures later).’
This is my fabric (right sides together) all cut out. I actually pinned it together here, but ended up taking all those out for the next step.

Next I pinned the zipper in place (just one pin on either end) to mark where it would be, and then sewed the two fabrics together on either side of the zipper. But I only sewed about 2 inches on each side, so that i could still open up the pillowcover to make it easier to install the zipper.
‘
‘

Once I had the sides sewn (which also kept my two pieces aligned to each other), I opened up the two sides of the pillowcase to lay it flat and positioned the zipper exactly how I wanted it. Then I pinned one side of the zipper in place, with the outside facing down (or out). To do this, I folded one edge of the fabric down, and then pinned the sipper to this folded edge of fabric.
‘
For the other side, I actually sewed the flap down first to keep it in place before I pinned the zipper.
‘
As you can see, I made the flap pretty big, more than an inch.
‘
Then I went back and started pinning the other side of the zipper to this larger flap.

I kept checking the other side ofthe fbaric to make sure that I was leaving enough of the flap free to cover both sides of the zipper from the outside.
‘
Once I had it al pinned, I sewed down both sides of the zipper, and then I sewed perpendicularly arcoss the ends of the zipper.

Phew! Hard part is done! After that, i just sewed all the way around the edges of the pillowcase sides from zipper to zipper. Note – I serged the raw edges of the fabric first)
‘
That’s it! Turn it right side out and you are done!’
And yes, the zipper flap worked! Yay!
‘
Well, that is one completed project.
Project #1 update: The Growth Chart

After buying a very expensive roll of photo paper, I found that contrary to my belief, my printer does NOT print on rolls of paper. ARGH! What a waste!! I will see if I can put it on craigs list…
Anyways, I went ahead and ordered the growth chart to be printed by Vista Print today. Unfortunately for the size I need, the only option was vinyl. Atleast their vinyl has a matte finish instead of glossy, so hopefully it will look ok.
One bonus is that their banner is 30 inches wide and I only needed 13. SOOOOOOO, I am getting 2 growth charts printed! I will just need to cut it down the middle, and then I will have one to give as a gift! There was also some empty space on top, so I made a simmple welcome sign out of it. We’ll see how that turns out!

Well, thats it!
A very random approach to a quilt…
I was hoping that all the fabric I ordered for the new baby’s quilt would arrive last week, but it didn’t. SOOOO…..I started working on a quilt qith fabric that I bought over 6 months ago! I never ever thought of making quilts, until I went into a local store and saw some really cool modern quilts, which I really loved. So I decided I would try to make one. I am in awe with the skills of those who make the super intricate, traditional looking quilts, but that aesthetic is not for me. I’m trying to go with more simple, modern/contemporary.

The fabric I bought was a bunch of fat quarters. So I just started cutting! As you can see above, I basically cut everything into 3 inch strips (no, I did not have a plan at this point)

Then I cut those strips into different sized pieces – ranging between 6-14 inches long.

The site of them all stacked together was pretty intimidating!
Then I started sewing (still no concrete plan)!
Below you can see my long strips of each piece sewn end to end. I did take the time to iron down the seams…mainly because I got a new iron after my 10 year old one gave out on me and although I hate ironing, I can’t resist a new gadget =)
I love all the colors together!
So my plan (which has emerged as I’ve been sewing): is to put these strips together so that they run diagonally across the quilt. We will see how it goes….keep your fingers crossed!

These are the fabrics I’m going to use for the back (sorry, dark picture). I think I’m going to do 2 panels, one of each of these fabrics, with one skinny strip of the front fabric going through the middle of them.

I’ll keep you updated on how it goes!
Say AAAAAAAAHHH!
This week’s photo challenge at IHeartFaces.com is the letter “A.”
So this is my little niece saying “AAAAAAAAAAAAHHH” for her beloved rattle!

Check out some more great entires here!

Our attempt at Maternity pictures
As I mentioned, this weekend I had my “OMG” moment of realizing how close we are to the baby coming. So I told L that we HAD to take some pictures this week!
Here is one that I like..I still have to look through and edit the rest. Unfortuantely it is very much winter here so the grass is ugly and there is barely any green around…and you can see all the neighbors houses through the bare branches…but at least we can see the baby bump!

I’m hoping to get a few more pictures – standing form the side, and with R and me. Hopefully we can make it happen!
Project #1: The Growth Chart
Ok, so I have finished designing my growth chart!
I am waiting for my photo paper roll to come in so I can print it…but here it is:

I made the whole thing in Adobe Illustrator – drawing everything from scratch. That was not my original intention…but that’s how it goes, right?
I’m going to use that graphic at the top of the 4 elephants (supposed to be our family) on our birth announcements and thank you cards as well.
I got the idea from this card:

As you can see it is similar, but not exactly the same. Hmmm…Maybe I’ll make the baby elephant yellow like in this one…I like the way it stands out…
I couldn’t resist making the hearts as well. They add a really cute, whimsical touch!
I actually had a slightly different version I was working on as well:

But then I decided I wanted our 3 year old daughter represented in the graphic as well. Even then, I first drew a second elephant with its trunk curved down as well, but then changed it to make the slightly larger sibling with her trunk above the baby to make them stand apart.
This was my original plan:

And then I tried to put an elephant in their trunks kind of like a cradle, but it didn’t work so well. It looked too stiff, and I couldn’t really figure out how to make it look like it was cradled or sitting…I guess elephants don’t really sit, do they?

I hope it turns out well! I’m debating putting a texture effect on it in Photoshop to make the elephants look a little bit more worn…but I’m not sure…we’ll see!
Any suggestions for changes before I print??
Getting down to business

34 weeks. yesterday.
!!!!!!!!!!!!!!!!!!!!!!!!!
I can’t believe it! I have been thinking…”i have time”…not so much! Especially considering that I started having contractions 6 weeks ago…eek!
Ok, so that kick in the butt finally got me to pick out a nursery decor idea. I didn’t really do that for my first (isn’t it usually the other way around?) For her, we bought a crib set we really liked, painted the walls yellow, and then painted a whole bunch of paintings for the walls. I was pretty happy with it.
But this time, I for some reason feel like picking a color scheme and trying to keep things matching.
My theme you ask?
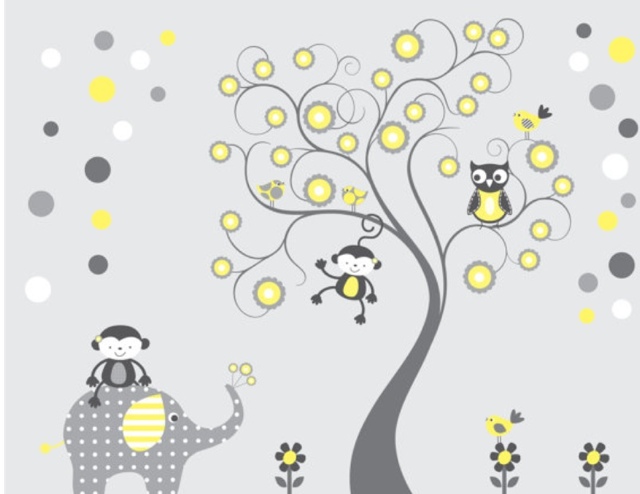
GRAY AND YELLOW…mainly geometric patterns with some elephants
Here are some examples of nurseries that I really love and am using as inspiration:


I also love these tree decals in this nursery behind the crib:

I found a similar one on etsy that I think I might get:

As far as other things I really like that I am thinking of trying to tackle in the next couple of weeks…
CRIB SET
I am in LOVE with this crib set from

And I think I’m going to get the bumper and the crib skirt. I already ordered a yellow crib sheet from amazon (much cheaper!)…hmmm…maybe I should have ordered two…

They also have some other coordinating items.
I’m thinking of getting one pillow…

…but I think I’m going to make my own drapes and just buy the fabric from them. I think I’ll accent with some yellow on them as well.
![]()
Land of nod also has some cute drapes:

I’m also planning on making a changing pad. I checked out one of the ones I have, it looks super easy! I might make it in yellow dimply soft fabric, as well as the chevron.

GROWTH CHART:

Unfortunately this one was custom made for the owner of the blog (click on the picture to visit)…so I’m going to make one myself as well. I have a printer that can print 13 inch rolls, so I just bought a roll of premium photo lustre paper, 13 inches wide, and am going to design my own grown chart. Then I’ll just have to fashion something at the top to hang it! I’m really excited and am largely going to use this one as my design inspiration. I’m down to the wire here, so I don’t have time to re-create…I’ll probably use elephant drawings I have already done and tailor them to look like this…
GLIDER
Carousel designs has some rocking chair pads, but they are way too small for my glider. I went to dutalier.com to see if I could order some new cushions and save myself the effort of making new ones, but they don’t have ANY fabrics that I like. SO…..I think if I have time, I will make new covers for my existing cushions…yikes! I think most of them will be straight forward except for the arm covers.

MOBILE
I am already more than half way done with a bird mobile I was planning on making. I got the idea from a local fabric store:

But I have made birds of all different colors, because it was way before my revelation of how I want to do the nursery!

I really like this one…but am thinking I might make one myself with really simple 2-D elephants that are gray and yellow:

KNITTED BLANKET
I started knitting a blanket a while ago, and LUCKILY i bought gray and yellow yarn for it…yay! The pattern is from Martha Stewart:

Source: marthastewart.com via Subha on Pinterest
I am about 1/3 way done with the blanket, so hopefully that will be completed soon.
Lastly, I am planning on making a quilt. Yes, my
VERY FIRST quilt
A little over zealous you think? Yeah, me too…
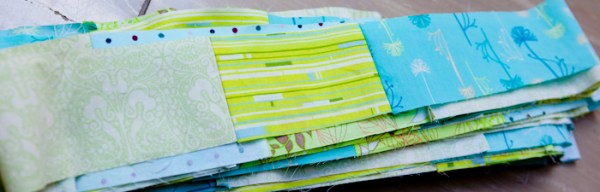
I just ordered all the fabric last night:


I am kinda winging it with the pattern. I am planning on making the front different size rectangles all put together in rows, and the back I was thinking of doing wide rectangles that go all the way across thew width of the quilt, using 4-5 different fabrics. Then I will use the yellow polka dot fabric for the binding.
HOWEVER, I did see this blanket on etsy

And may make something like this – i.e. no batting, just a soft underside. Since I have never quilted before, I feel like this might be more manageable in my short time period. Maybe I’ll at least start with something like this and then move on to a quilt later! I have yellow simply dot fabric that I can use for the back instead of the charcoal gray, which I think will be a more fun!
ANNOUNCEMENTS
I am also trying to plan ahead for my baby announcements. I foiund a design I like online, which matches my theme pretty well. I’l probably make some version of this – not exatly the same and get it printed myself. Just trying to decide where I’m going to print. I.e. fedex office – in which case I’d cut myself to save money…but will there be time? Or vistaprint.com – in which case it would have to be glossy postcard size. We’ll see…

Or I might even get them printed as 5×7 photo prints. I think if I get them printed from a professional company like mpix.com they will look substantial enough to stand on their own…
BOOK SLING
Oh yeah! I LOVE this book sling on the Domestic Adventure blog. Definitely have to make one of these:

And will also make some wall art:

Well, that’s it for now! You can follow my nursery board on pintrest to see what else I’m thinking of…
![]()
