IHeartFaces Photo Challenge: Hugs & Kisses
This week’s photo challenge at I Heart Faces is “Hugs and Kisses”
I love this theme because I love seeing how happy people are in the pics!

Check out some more great entries here!

Easy Vinyl Bags by Lil Blue Boo
If you are Typa A like me, you might wish you could put everything in a little baggie to keep things all organized =)
My husband often jokes that if I could put him in a tupperware box I would…hmmm………………
=]
A while back Ashley from Lil Blue Boo posted a tutorial about how to make quick and easy vinyl bags. Well, I finally got around to making them!

Here’s my version! Check out her tutorial here. The main difference between mine and hers are that I used double fold bias tape for all the edges instead of the elastic. Only because I had a lot of inexpensive bias tape I bought from Pick Your Plum, and I didn’t want to use up all of my elastic!

I love these bags because they are clear, so it is easy for R to see what is in them and decide if she wants to play with them or not, AND they don’t take a lot of space!
Look at this picture above – I used to have these little spiral art thingies in that gold box (only because I didn’t have anything else to put them in) and now I have them in a bag that is way more compact. And you can actually see what is in it! I don’t know how many times I opened that box saying “what is in this thing??”

And really, they are quick and easy. I made all of the ones you see in the first picture in one afternoon – actually less than one afternoon. Probably 2 hours?
As you can see in the first picture, I made a lot of different sizes to fit different things. In fact, I might use some of the smaller ones for my “toys” =)
I also made a really wide one, and put 2 elastics on it 1/3 of the way in from each side for larger toys.
So if you wanna make some, buy a vinyl shower curtain or table cloth, go to Lil Blue Boo’s tutorial, and get started!
Have fun organizing your hearts out!
Severe Procrastination – Valentine’s Day Cards
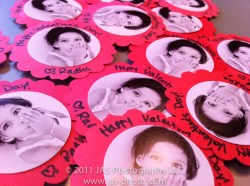
This picture was taken on February 14, at 7:45AM. 45 minutes before I needed to leave to take R to school.
And yes, they are meant to be Valentine’s Day Cards!

I was thinking I wouldn’t make any this year, but then this morning I was thinking: “What if everyone else makes some and R feels left out?” (Did I ever mention that I think motherhood = guilt?)
So, I rushed around this morning, printed a sheet of pictures, used my handy dandy paper punches, and made these cards for her to give to the kids at school.

Hope they like them and hope she has FUN!
Happy Valentine’s Day Everyone!
Photo Tip & Friday Freebie/Tutorial: Clipping Masks & Free Photoshop Album Template Download
Well, after 6 days of spending all day on it, I have FINALLY finished my 2011 Family Album!
I can’t wait to get the finished result and will definitely show pics once I do.
Here is the cover:

And a sample of one of the pages:

I decided to go with blurb.com for publishing the book. They seem to have good printing, I was able to upgrade my page quality to a matte/lustre finish which I like better than the standard paper, and it looks pretty professional. Another cool perk is that for $2, I was able to instantly download an epub version of the book to my ipad! It is especially cool because I could send the link to my family and they are able to download it as well – so everyone can enjoy the album!

So, how did I make the album?
Here is where the Friday Freebie comes in: I used photoshop to make templates and then used the clipping mask feature.
What in the world is a “clipping mask” you ask?
Photoshop works with layers. The cliipping mask feature works with those layers – you create clipping mask of one layer (the upper layer) to another (the layer immediately below it).
What it does, hides all parts of the upper layer, except that which matches to whatever is on the lower layer.
Ok, a little confusing…let me show you some pix.
In the picture below, you see an image in photoshop with 2 layers: the bottom layer is the plain white background. The layer above it has the gray square, and the rest of it is transparent.
![]()
In this picture you can see the layers.
What I want to do, is insert my picture (layer 3) that you see below, but make it show up only where the gray square is.
When you make a clipping mask from layer 3 to layer 2, the only part of layer 3 that will show is whatever is OVER the gray box on layer two. It doesn’t matter what color the shape is on the lower layer – it just looks for any non-transparent pixels, and shows that part of the upper layer.

As you can see in this picture, if I show layer 3, it takes up a lot of the canvas, and is not fitting into the gray box.

If you right click on layer 3 (the one with the picture), you get this menu:

and you choose clipping mask. Or, the faster way, is to use the keyboard shortcut: alt/option + command + G
That will clip the layer you are on, to the one below, and your layers panel will look like this (you see the layer thumbnail indented to the right with a little arrow pointing down) :

and now our image looks like this:

That’s it! Once you have clipped the layer, you can resize the layer with the picture on it to make it fit into your clipped section better. To do this, I use the free transform option (command + T, or you can go to Edit -> Free Transform) and resize it however you want. If you hold down the shift key while you resize your picture from the corner, it will keep it’s original proportions.
That’s it! That’s how I made my whole album! I first downloaded (bought) a few templates from Album Cafe, and then once I understood the process better, I made my own templates.
So the freebie for today, is the following template:

Right click on the image to save the link (the .psd file) for the photoshop template
Right-click on the image above to download the PSD (photoshop) file to make this page.
So to recap how to use it:
1) Open the file in photoshop
2) Bring pictures into photoshop that you want to put on the page. Make sure that whatever picture you want to correspond to the appropriate picture holder, is immediately above that layer.
3) Once you have the picture layer above the shape layer where you want it to show up, use the clipping mask feature (right click on the layer and choose “create clipping mask” or press alt/option + command + G). To try to make this easier, I have numbered the different picture holders and matched that to the layer number.
4) Then use the free transform feature (command + T) to move and resize the picture however you want it to look on the page. Make sure that when you use free transform, you have the picture layer selected that you want to edit.

If you have any questions or it isn’t working, feel free to ask!
Hope you enjoy!

IHeartFaces: The Letter L
This week’s photo challenge at I Heart Faces is the letter “L”
So this is our (my R and me) interpretation of L!
‘
‘

PTOW: Join National Association of Photoshop Professionals (NAPP)
In December, I took a course on Lightroom in downtown, and learned some cool stuff. But the bigger thing I did while there, was join NAPP: The National Association of Photoshop Professionals.

I always thought it sounded kind of silly, and I didn’t rally understand why it would be good…but I talked to other photographers at this course, and ALL of them were members and happy with their benefits. So I said, what the heck?
I bought a 2 year membership – along with a 1 year subscription to Kelby’s Online Training (I’ll talk about that separately) and I have LOVED it. It has been SO AWESOME!
The best part: The Educational Videos

Here is an example of the simple help videos – I searched for “actions” and got all of these choices. These are great, short (2-3 minute) videos that explain whatever you have searched in photoshop. I have learned so much in watching these videos – photoshop is like a new program for me!

Plus, there are lots of resources for Lightroom users as well.

In case you are wondering, no I do not get ANY money or sponsorship for this post. I just think it is a really great resource that I didn’t know about, and so want to share with everyone.
Oh yeah – there are also all sorts of discounts and other things available for NAPP members. So always ask when you are buying photography equipment.
If you are not ready to buy a membership yet, and own an iPod/iPhone/iPad/Apple TV – check out some of the photography podcasts created by some of the NAPP educators. I just did a search for “NAPP” and got several free ones which have really been great. I have used what I saw in a couple of the videos in the last several days dozens of times already!
Well that’s it, short and sweet today. Check it out!
Simple, inexpensive, every day cloth napkins
Do you feel guilty about the number of paper towels/napkins you and your family waste in a week?
I do.
Every time I put a new roll on the holder, I feel bad. I even tear mine in half or quarters, since we rarely need the whole napkin.
It just seems like a lot of paper to waste!
SOOOOOO…….I decided to make some simple cloth napkins!

I actually also bought a couple packs of simple, cheap, wash cloths from Walmart ($4 for 18 towels) that I use for cleaning up, or when R is painting etc.
So to make these, I took the EASIEST paths I could manage.
First of all: I used fabric that I had and didn’t care for any more. For some reason, the first time I went to the HUGE Joann’s near me, I had been sewing for all of about 2 months, and didn’t know what I was doing. Once there, I was so over whelmed by all the fabric choices, that I went a little crazy and bought DOZENS AND DOZENS of different fabrics. Not only that, but I had not concept of yardage, and bought 1-2 yards of each! Needless to say, my wallet was completely deflated, and I have been using that stash ever since (that was 3 years ago!). Not surprisingly, there are several fabrics in there that I don’t really like any more and can’t see myself making anything out of. SOOO…that’s what I used for my napkins. I definitely would rather have fun, bright colored napkins, but I figure I might as well use what I have. Plus they are dark colored, so should hide all the crud!
Second shortcut: Since I wasn’t really worried about making the napkins pretty or making them match (remember, the main purpose of these napkins is to be FUNCTIONAL), I cut the fabric on the folds. I basically folded it up into halves over and over again, and cut along each fold. That way I didn’t waste time measuring. I just new I wanted small napkins, so I made them all pretty small – I think they are about 8 x 10 inches or smaller.
Third “shortcut” (but not really): Instead of using my rotary cutter, I thought I would be really smart and use my new pinking shears. I figured I wouldn’t have to sew anything! WRONG!

This is what I ended up with after I washed them. A big frayed mess! I thought pinking shears were supposed to prevent fabric from unravelling! Ummm…not so much.

As you can see in these pictures, it looks like one side didn’t fray as much, while the other did. But regardless, I ended up with a lot of stringy mess!

So, I had to go back and sew the edges.
Third (real) shortcut: I serged the edges of the napkins instead of turning them under and sewing them. If you don’t have a serger, you could do a zigzag stitch around the edges with your sewing machine. Looking back, I wish I would have done this because now my seams are at risk of unravelling since there is no way to backstitch on the serger.
Fourth Shortcut: Instead of sewing each side and cutting the thread each time, I serged in one contiguous line from start to finish. I know you don’t really turn corners with sergers, but I figured, why not??
Plus, my serger knife decided to STOP working! ACK! I wasted about 3 hours trying to figure out what was wrong – to no avail. Then I wasted another 2 hours cutting all the frayed edges and threads off the napkins before serging them since the serger wouldn’t do it for me. So save yourself some time – do NOT pink your napkins and then wash them! If anything, you can pink them, but sew them before washing.

As you can see in these pictures, I basically sewed to the edges, then before the fabric and stitches came completely off the stitch finger (i.e. before it went too far) I stopped, and turned the fabric 90 degrees and continued sewing! As you can see in the picture below, they didn’t always turn out perfectly. Honestly, I wasn’t willing to put more time into these than I already had, so I didn’t worry about it. Given that I am extremely type A, this is a big step for me.

When I got back tot the starting edge, I tucked the beginning thread under so that it would get sewed in at the end.

Unfortunately, I think these seams are at risk of unravelling. There are things you can do to secure them – some people say they thread the tail into the stitches, others use seam sealant on the corners. I think I might buy that and add it to the napkins.

That’s it! It will be much faster the second time around, when I think I will probably use more fun fabric. =)
So I encourage you to make some green, sustainable napkins for your family too!!
Rainbow scarf: A Simple Crochet Tutorial!

A friend of mine made her daughter a crochet scarf a little while ago, and I fell in love with the idea!


Since then I have been looking for rainbow colors in yarn to make my little one as well, and finally put together a collection of Stitch Nation’s Full O’ Sheep wool yarn. I really like the colors which are pretty vibrant.

I thought the yarn was pretty soft, but after finishing the scarf, R hasn’t really worn it until I bribed her for these pictures…I’m thinking of trying a conditioner bath for it to see if that helps!

Anyways the scarf is pretty simple – it took me about 3 hours to make. And I am not a crocheter…so i’m sure this would be even faster for those of you are pros!

As far as a pattern, I looked online at several different versions of people’s rainbow scarves and other scarves, and knew that my main requirement was for it to be SIMPLE, and I wanted it to be somewhat twirly.

Wanna make one for your little one?

Or for yourself?

I edited a couple of patterns that I saw and came up with this:
1) Starting with purple and one crochet hook SMALLER than recommended, chain the length you want the scarf to be.
2) Turn, and still using purple switch to a crochet hook that is one size larger. Loosely HDC into each of the next 10 chains, then HDC TWICE in the next chain. Repeat this pattern (1 HDC into next 10 chains, then 2 HDC into the 11th) all the way till the row is finished.
3) Switch to Blue: same pattern as above: 1 HDC into next 10 chains, then 2 HDC into the 11th) all the way till the row is finished. Turn.
4) Repeat step 3 for each new color until red. You can leave a tail of each yarn hanging when you start and finish a color for your ends.

And that’s it!

Increasing the 2 HDCs in each color gives the scarf this curved look – which I thought went well with the rainbow theme.

And when it is on or dangling, it has a nice twirl!

I didn’t plan my ends well enough, and they ended up short and awkward. I originally had long pieces of yarn, and I cut them short thinking I would have a full little end of yarn pieces of all different colors. But with the wool, it jus tlooked messy. So I decided to braid them, which I thought looked much better. Problem was…I had already cut them all! And I was too lazy to thread more yarn in that was longer.
So pick what you want to do before cutting! If you want to do the braids, you will need to just add a few more strands of yarn of each color on each end, and then braid them together!


‘
ENJOY!

I Heart Faces: Oh So Silly!
This week’s photo challenge is “Oh So Silly!”
You would think I have more of these pictures to submit…but usually when R is being silly, I’m busy laughing!
But this is her being her usual self while playing on the swings =)

Check out some other great entries here!
My tree Skirt
Did I ever show you guys my tree skirt?
‘
I know it is a little late, but thought – better late than never! I have been so busy with work and guests over the last month that I brought on some early contractions and had to be on bedrest for a while (yeesh – not easy!). Things are better – I guess my body really did need rest – so I finally got around to taking some pictures of the skirt.
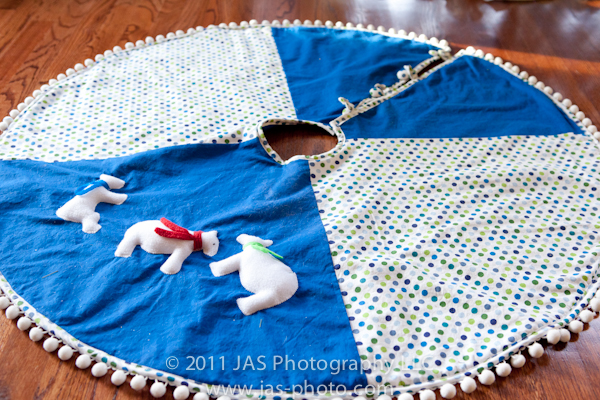
Our tree colors this year were blue green and silver, and since we had all our family over for christmas, I thought it would be nice to actually have a tree skirt instead of just a white sheet piled up around the base of the tree!
‘
Well I looked and looked, but didn’t find a tree skirt that liked…that didn’t cost an arm and a leg. So of course, my next thought was…I’ll make one!!
Needless to say, I now understand why they are so expensive. Not that they are complicated, it just took a long time!
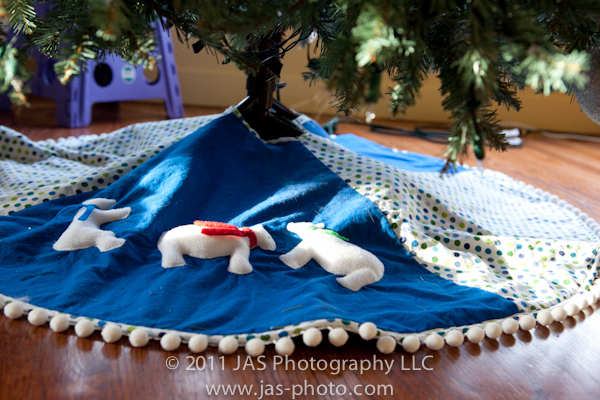
So here is my finished product. I went with blue and green of course, and used my husband’s suggestion of white polar bears as a decoration piece on the skirt.
‘
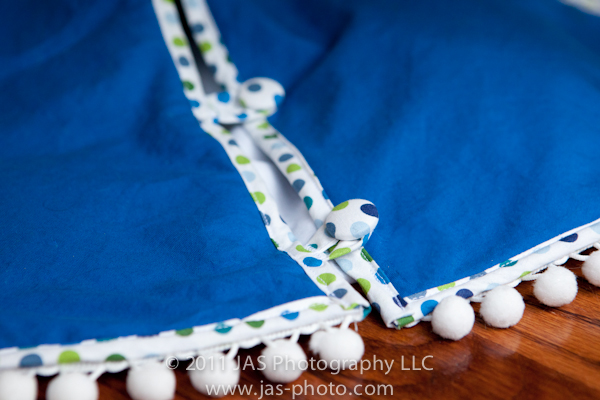
I made bias tape for the first time! That was a day long project in itself, but definitely added an extra touch to the skirt. Will I make more again?? Umm…not for a while!
The fabric buttons were probably the EASIEST part of the whole project. I had no idea how easy they are! So that was a fun discovery =)
‘
And the little trim along the outer edge was of course, something store bought. I was afraid to add it thinking that it may be too enticing for the cats to play with, but they were pretty good!
How did I make it?
I went online and looked at lots of different people’s tutorials on how to make tree skirts, including soe YouTube videos, and then I kinda fudged it as I went along. I used quilting cotton for the top and bottom (the bottom is plain blue). I used fleece for the lining to make it more substantial feeling.
Basically I just made the 4 panels for the top, I made one big circle for the bottom, but actually sewed 4 seams down the 4 points so that it would match up with the top. Once I had my two circles done (i.e. top and bottom), I pinned up the top, bottom and fleece. I sewed around the outside edge and then turned it right side out. This last part was a little tricky because I kept setting up my peices in the wrong order. I wasn’t used to working with 3 layers instead of just two.
‘
Once it was right side out, I sewed the bias tape around the outer edge and inner circle. Before sewing bias tape on in the cut seam where the buttons are, I made 4 button holes where the button straps would come out, and then sewed those in place at the same time (I used bias tape for the button straps as well).
Then I sewed on the outer fuzzy ball trim and the fabric buttons – and it was done!
I know, not a detailed description, but I figured it could give you a general idea of what is involved. So in case you feel like preparing for next year…ha ha just kidding!
