I heart faces photo challenge: Friendship
Although they have their fare share of fights, my niece and nephew are definitely best friends first!


Shirt solution for a short torso
I have a REALLY short torso…
so, shirts are usually way too long on me.
on top of that, i have HUGE hips! So all my shirts are too tight once they pass my waist
I recently bought several tops from old navy – simple jersey shirts, and of course had the same problem
this time, instead of returning them, i decided to use my new sewing skillz =)

For most of them, I used a twin needle and simple made a new hem on the shirt, and then cut off the excess fabric.
 Pretty simple.


For this one, however, I had a little bit of fun. I made several rows of pintuck seams along the bottom of the shirt. This way I kept the original hem, shortened the shirt, and made a cool pattern along the bottom. plus, the extra sewing along the bottom of the shirt made it stretch out a bit, which accommodates my hips better.

Stil have a long way to go before these efforts look profressional, but better than returning the shirts!
A Fresh Garden Meal

Thanks to our bees, we have been getting tons of great tomatoes!

As well as cucumbers and eggplants (made baa ghanouj from those!)

I’m SO proud of my eggplants!

And of course of the monstrous cucumbers too =)

So the first part of the meal was a yummy cucumber soup – the recipe is from emeril and can be found here.
I did edit the recipe and make it a little bit simpler. I just threw everything in the blender – minimal prep. I.e. I didn’t really chop things up much – epsecially the herbs. I just threw them in. I also didn’t bother measuring – just estimated. I added some lemon juice, and lastly, the recipe calls for making an “essence” to add to the soup. That seemed to time intensive for me, so I just through a little but of each of those ingredients into the blender as well.

The main entree was pasta pomodoro in classic italy style. In fact, we used the recipe that we got from a chef at a cooking class in Italy a few month ago. We didn’t make this pasta in the class, but I asked the chef for his recipe because pomodoro sauce was one of the main things we LOVED in italy!

Luckily, the recipe is really easy:
1) Blanch the tomatoes so you can peel them. You want to use very red tomatoes, preferrably san marzano. You can also use canned whole tomatoes for a faster option or if you don’t have fresh tomatoes! To blanch the tomatoes, remove the stem, ad then cut a little x into the opposite end of the tomato. Then put them in boiling water for about 1 minute. Remove them from the water into a bowl, and peel the tomatoes. I kept the tomatoes in the bowl and just lifted the skin off and put it directly into my compost bowl. That way all the tomato juice stayed in my bowl to use. You can remove seeds if you like, but it is fine with them as well. You may also want to remove the stem attachment part of the tomato.
2) Heat your pan over low heat, and once warm add a generous amount of extra virgin olive oil. After a few minutes, add several cloves of smashed garlic (peel your garlic cloves, and then smash them with a meat tenderizer or the handle of a big knife). Cook the garlic until it turns a golden color. You can also add red chilli pepper flakes if you like.
3) Once the garlic is golden, add the tomatoes (first roughly chop them up) and generous amount salt (to taste. as the italian chef said, the bulk of the taste comes from the salt!). Add some basil sprigs and STEMS. The stems (as L’s cousin the chef informed us) have a ton of the flavor from the basil plant! Then cover the pan and let it cook over low heat for 10 minutes.
4) Uncover, and if you like, add a small dash of sugar (after tasting it only. you may not need the sugar!). Remove the basil stems and add the rest of the roughly chopped basil leaves. And that’s it! You’re done! If the sauce is too liquidy, you can simmer it to reduce it a bit.

Enjoy!
A Fun Toddler Beach Robe!

I recently found an awesome beach robe pattern at Made (www.dana-made-it.com) and decided to try to make it before our beach trip last week.

So I got this cute cow towel, and then a plain yellow towel for the belt.

Change from pattern: I originally followed the instructions to make the two separate ties that attach on the sides of the robe, but wasn't completely happy with it because the ties ended up hanging down onto the ground and then I was constantly worried R would trip on them. I also decided I liked the way the robe looked with the belt all the way across the back better. So I took the two belt pieces out of the side seams, and attached them in the middle. Since the seam looked funny, I put a strip of double fold bias tape across the seam to hide it. I also put two darts in the back so that it wouldn't be so big on my little skinny minny.
Although the robe took longer than I expected and more steps than my short attention span can usually handle, I finally got through it.

…and it was definitely worth it! I love it, and more importantly, R loves it! She wore it a ton this week and I LOVED seeing her in it!

Change from pattern: I lined the ends of the sleeves with yellow fabric (the same one that I used to line the hood) so that when the sleeves are folded up, you can see the lining. Then I used embroidery thread to sew the proximal edge of it down (the sleeve was too small for me to sew it with the machine, so I figured I would make a design element out of it).
Sadly, I didn’t get any pictures of her in it on the beach…

But she enjoyed it plenty at home as well!

…and so did tigy…

Don’t you want to make one too?
Toddler’s Sunhat – It’s Not too Late!

A while back, I mentioned that I was going to make a sunhat for R. Thanks to Grosgrain’s free pattern month, I had a great tutorial by Prudent Baby I was able to use!

We have been using it a ton at the beach, which has been great!

R likes it to because it is light and has a fun pattern!

I did make a few adjustments to their pattern:
1) as you can see above, I just used my serger to serge the top of the hat and the brim together, instead of pinning the inside of the brim in.

2) Then I turned it right side out and top stitched another seam along that one to keep the inside seam allowance in place.


3) Lastly, I felt like the pattern resulted in a hat that was bumpy and stick out at the corner seams, so I sewed an extra seam on the inside to bring it in a little bit.
I probably could have done more, and will next time!

But all in all, I’m happy with the result!

Weekly photo challenge: HOT!
I haven’t done this in a while…but happy to enter again!
Here is my entry for “HOT!”

A fun family activity

Recently, we had a mini family reunion, and as one of our activities, went to a local pottery painting place with the kids. They (actually all of us) had SO much fun! It was a great chance for everyone to be creative, and have fun at the same time. The kids really got into the painting! I don’t yet have pictures of the finished products (I haven’t seen the yet either!) but thought I’d share the idea as a fum summer activity.
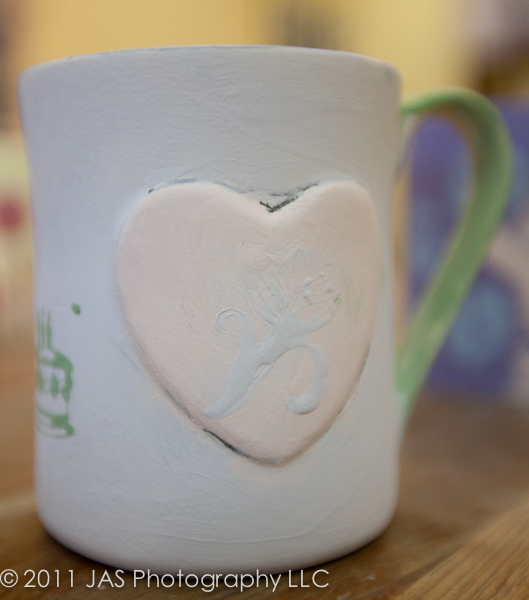
Here are some of the things we came up with it!

The above is my mug. I tend to get overwhelmed by having many choices, and therefore had originally decided to just paint rainbows on the cup knowing that R would like that. But then L had the idea of painting flowers – he reminded me of how much I (we) loved the red poppies all over Italy (you can see the dress this inspired here) so I decided to make a mug inspired by those images!

And some of the other beauties as well!
So find your nearest pottery painting place, grab a friend/family member, and have fun!!
Free Lightroom Presets Today!
Today I thought I would do something new and share some of my Vignetting presets for Lightroom with you.

Vignette is something that can happen on its own with very wide angle lenses on full sensor cameras as an artifact of the glass properties itself…but it is also something that you can ADD to pictures to give them a special touch!

Of course, you could manually vignette pictures whenever you would like, but the nice thing about having presents is
1) You can quickly apply the vignette effect to many pictures, very quickly
2) You can save your certain style of vignette and apply exactly that same amount each time (more in another post about how to update a preset)
3) You can preview what your different presets will look like in the navigation pane without having to apply and remove each one

I have put up a set of presets – 4 to be exact – to give you different levels of vignetting depending on the picture.
Below, you can see what the different levels look like:

To download the presets, follow these directions:
(FYI – i can not upload ZIP files to wordpress, so I have housed them in my other website where I sell Hindi and Gujarati Flashcards for Kids, called “Baby Culture Cards”)
2) Find your presets folder on your computer: Right click on any preset in lightroom, and select “Show in Finder” or the equivalent on a PC (sorry, don’t have one!)
3) Unzip the presets you downloaded
4) Move them to the presets folder
5) Restart lightroom – and you are good to go!
You can then edit them or rearrange them however you would like.
Enjoy!
Quick & Easy Kids Art Display

R has made lots of cool art lately, and I have been wondering how best to keep up with it and display it. I wrote before about how I scan or take pictures of everything so that I have a digital image (that I can reproduce later) of it, but I still want to look at the pieces day to day.

So, I bought 12×12 cork board tiles from my nearest office supply store, and stuck them up on the wall! I didn’t measure anything out first…mainly because I’m too impatient and that step makes me crazy. So I just put them up my eyeballing it. Then I just put up her art!

The fun part is that I put it up right outside of her room, so that every day when we walk by, we can see it. And she can understand how important her art is to us and how much we treasure it! Unlike the picture above, you can’t even see the cork boards now because I have so much stuff up on them. But in order to keep up with her newer pieces, I basically take one down to put one up. Works pretty well!
Thanks for stopping by!
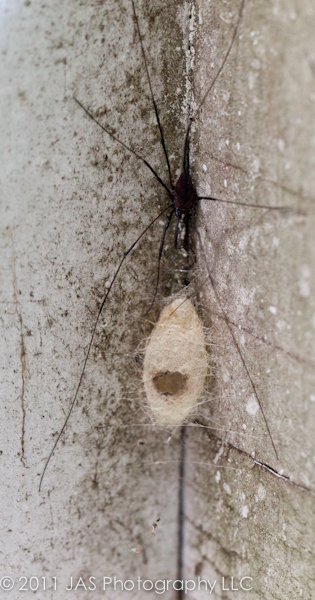
Crazy spider webs from our hike
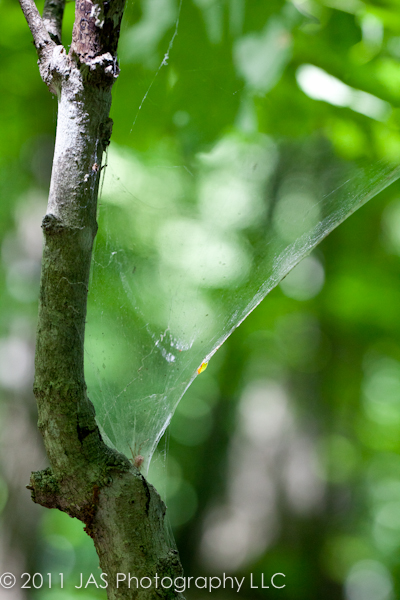
i posted a little bit ago about how R loved finding bugs during our hike last week. Well here are some crazy spiders/spider webs that we saw!