Father’s Day Gift Idea from a new (to me) blog: Lil Blue Boo
In my wanderings through the internet for ideas of things I want to sew, I came across this blog: Lil Blue Boo. I particularly like this one because she blogs not just about sewing, but all sorts of different crafts. This woman is truly amazing!
Last night, when I was supposed to be sewing a hat for R but instead was printing 18 8×10 prints that were ordered from my last photography session (yay!), I received an email with this post from the blog about yarn art. I was SOOO excited to put it to use to make a present for L’s upcoming Bday …actually it is today – but doesn’t feel like it because it was working all day =(
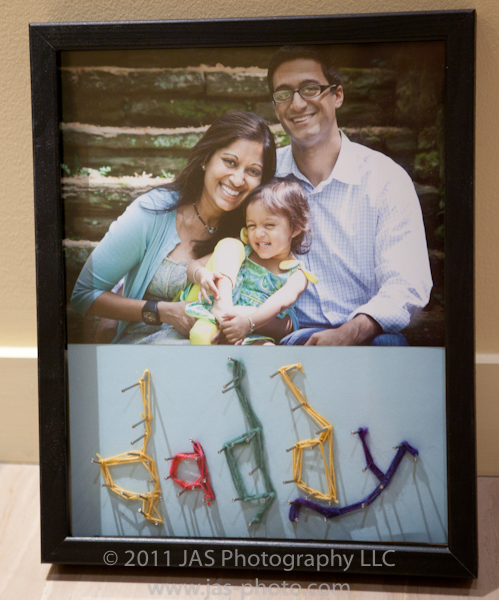
Anyways, I hurriedly tried to put something together for him using this idea and this is what I came up with! It is far from perfect because i didn’t have time to go to the hardware store to buy wood to nail the nails into. I went to AC Moore to get the shadow box frame and was hoping to find something hard there to use – but didn’t find anything the right size. So I found some corrugated cardboard laying around my house (no joke) and used that instead. it is FAR from sturdy, but I figure – it is in a frame and will be on a wall…hopefully it will be fine! This is my problem: when I want to do a project, I want to do it RIGHT NOW. Even if I don’t have all the proper supplies, tools…or even TIME (which is why many of the get done in the middle of the night with less than all the necessary equipment).
But hey – at least I know that about myself now. So now when I go to a fabric store or a notions store or a hardware store, I buy things that I know I might want at some point, and then when I want to use them, I already have them. This is bad because I have to then find a place for all of this stuff – and i HATE that task…but what can you do?
Anyways, check out the Lil Blue Boo blog for directions on how to make one of these babies. I essentially did what she did, but slightly simplified.
Here is a quick description of what I did, sorry I didn’t really take pictures – i was rushing to get this done before L came home for the evening, and I wasn’t planning on making a post about it at the time!
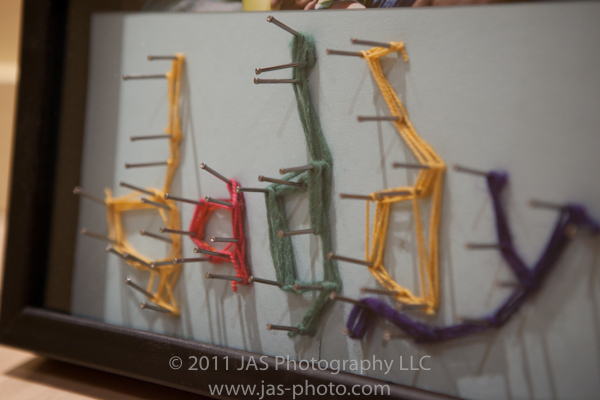
- Using my writing tablet, R and I wrote the word “daddy” in Adobe Illustrator, then printed it the size that I wanted

R's writing on my Wacom tablet in Adobe Illustrator. As you will see, my yarn art is a simplified version of this.
- After deciding what size I wanted the picture and the words, I printed the picture for the frame
- Then had to decide what color yarn and paper backing I wanted to use, and got all of that stuff out. I debated using fabric for the backing instead of paper, but I didn’t want to take away from the actual yarn art, so I stuck with simple paper.
- Taped the color paper to the bottom of the corrugated cardboard which would be my backing for the whole frame
- Placed the printed paper with the word “daddy” on it over the colored paper
- Hammered nails into the paper and cardboard at the turns in the words (this is the framework for the yarn)
- Removed the white printer paper – since I was nailing to corrugated cardboard which is not that tough, I made sure to hold the nails in place while I pulled the paper off. I had to get tweezers to remove all the paper from the middle parts of the wards and the small pieces left around the nails

Removing the printer paper with tweezers (don't mind my bruised fingernail - closed my thumb in the car door!)
- Then I began wrapping with yarn! This part was fun. In the post from Lil Blue Boo, she used twine – I went with what I had (of course) which is Yarn =)
- Once all the yarn was in place, I put my printed family picture at the top of the backing (used double sided table to secure) and then put it all into the shadow box frame, and I was done!
- Disclaimer – since I was in a rush, I did not have time to devise a way to make this super sturdy. The nails at the bottom half sit right up against the glass – but the top half where the picture is, has no nails to give support, so if you push on the back, it bows in. I am not super concerned because this is going to sit on L’s all in his office and not get handled, but if you are making this, you make want to put something on the sides of the frame on the inside to make it stay more secure. I think there are mo expensive frames that have a side insert specifically for this purpose.


All in all, it probably took about 3 hours – not counting going to the store to buy the frame. It would make a great Father’s Day gift!
Enjoy and definitely check out the Lil Blue Boo blog!

What a cute project! I love how you incorporated R’s writing the word “Daddy”, makes it so much more personal! 🙂
thanks! i feel like I was cheating a little bit since she doesn’t really write yet – but she definitely was controlling the pen quite a bit as we wrote it together!
LOVE it!!!!! What an adorable family photo too!
thanks ashley!!! i LOVE your blog and am so excited to see what you come up with!
Nice work…love how fellow bloggers help jog our own creativity! Cheers to making new connections and learning from one another 🙂
thanks! you are definitely right – so much of what I make these days is inspired by something I see on someone else’s blog – it is great!
by the way – love your pics and your blog! just subscribed! (I am originally from S Florida by the way)
That is so sweet! I love how R wrote out ‘daddy’! I am sure L loved it!
he did! thanks!