Simple, inexpensive, every day cloth napkins
Do you feel guilty about the number of paper towels/napkins you and your family waste in a week?
I do.
Every time I put a new roll on the holder, I feel bad. I even tear mine in half or quarters, since we rarely need the whole napkin.
It just seems like a lot of paper to waste!
SOOOOOO…….I decided to make some simple cloth napkins!

I actually also bought a couple packs of simple, cheap, wash cloths from Walmart ($4 for 18 towels) that I use for cleaning up, or when R is painting etc.
So to make these, I took the EASIEST paths I could manage.
First of all: I used fabric that I had and didn’t care for any more. For some reason, the first time I went to the HUGE Joann’s near me, I had been sewing for all of about 2 months, and didn’t know what I was doing. Once there, I was so over whelmed by all the fabric choices, that I went a little crazy and bought DOZENS AND DOZENS of different fabrics. Not only that, but I had not concept of yardage, and bought 1-2 yards of each! Needless to say, my wallet was completely deflated, and I have been using that stash ever since (that was 3 years ago!). Not surprisingly, there are several fabrics in there that I don’t really like any more and can’t see myself making anything out of. SOOO…that’s what I used for my napkins. I definitely would rather have fun, bright colored napkins, but I figure I might as well use what I have. Plus they are dark colored, so should hide all the crud!
Second shortcut: Since I wasn’t really worried about making the napkins pretty or making them match (remember, the main purpose of these napkins is to be FUNCTIONAL), I cut the fabric on the folds. I basically folded it up into halves over and over again, and cut along each fold. That way I didn’t waste time measuring. I just new I wanted small napkins, so I made them all pretty small – I think they are about 8 x 10 inches or smaller.
Third “shortcut” (but not really): Instead of using my rotary cutter, I thought I would be really smart and use my new pinking shears. I figured I wouldn’t have to sew anything! WRONG!

This is what I ended up with after I washed them. A big frayed mess! I thought pinking shears were supposed to prevent fabric from unravelling! Ummm…not so much.

As you can see in these pictures, it looks like one side didn’t fray as much, while the other did. But regardless, I ended up with a lot of stringy mess!

So, I had to go back and sew the edges.
Third (real) shortcut: I serged the edges of the napkins instead of turning them under and sewing them. If you don’t have a serger, you could do a zigzag stitch around the edges with your sewing machine. Looking back, I wish I would have done this because now my seams are at risk of unravelling since there is no way to backstitch on the serger.
Fourth Shortcut: Instead of sewing each side and cutting the thread each time, I serged in one contiguous line from start to finish. I know you don’t really turn corners with sergers, but I figured, why not??
Plus, my serger knife decided to STOP working! ACK! I wasted about 3 hours trying to figure out what was wrong – to no avail. Then I wasted another 2 hours cutting all the frayed edges and threads off the napkins before serging them since the serger wouldn’t do it for me. So save yourself some time – do NOT pink your napkins and then wash them! If anything, you can pink them, but sew them before washing.

As you can see in these pictures, I basically sewed to the edges, then before the fabric and stitches came completely off the stitch finger (i.e. before it went too far) I stopped, and turned the fabric 90 degrees and continued sewing! As you can see in the picture below, they didn’t always turn out perfectly. Honestly, I wasn’t willing to put more time into these than I already had, so I didn’t worry about it. Given that I am extremely type A, this is a big step for me.

When I got back tot the starting edge, I tucked the beginning thread under so that it would get sewed in at the end.

Unfortunately, I think these seams are at risk of unravelling. There are things you can do to secure them – some people say they thread the tail into the stitches, others use seam sealant on the corners. I think I might buy that and add it to the napkins.

That’s it! It will be much faster the second time around, when I think I will probably use more fun fabric. =)
So I encourage you to make some green, sustainable napkins for your family too!!
Rainbow scarf: A Simple Crochet Tutorial!

A friend of mine made her daughter a crochet scarf a little while ago, and I fell in love with the idea!


Since then I have been looking for rainbow colors in yarn to make my little one as well, and finally put together a collection of Stitch Nation’s Full O’ Sheep wool yarn. I really like the colors which are pretty vibrant.

I thought the yarn was pretty soft, but after finishing the scarf, R hasn’t really worn it until I bribed her for these pictures…I’m thinking of trying a conditioner bath for it to see if that helps!

Anyways the scarf is pretty simple – it took me about 3 hours to make. And I am not a crocheter…so i’m sure this would be even faster for those of you are pros!

As far as a pattern, I looked online at several different versions of people’s rainbow scarves and other scarves, and knew that my main requirement was for it to be SIMPLE, and I wanted it to be somewhat twirly.

Wanna make one for your little one?

Or for yourself?

I edited a couple of patterns that I saw and came up with this:
1) Starting with purple and one crochet hook SMALLER than recommended, chain the length you want the scarf to be.
2) Turn, and still using purple switch to a crochet hook that is one size larger. Loosely HDC into each of the next 10 chains, then HDC TWICE in the next chain. Repeat this pattern (1 HDC into next 10 chains, then 2 HDC into the 11th) all the way till the row is finished.
3) Switch to Blue: same pattern as above: 1 HDC into next 10 chains, then 2 HDC into the 11th) all the way till the row is finished. Turn.
4) Repeat step 3 for each new color until red. You can leave a tail of each yarn hanging when you start and finish a color for your ends.

And that’s it!

Increasing the 2 HDCs in each color gives the scarf this curved look – which I thought went well with the rainbow theme.

And when it is on or dangling, it has a nice twirl!

I didn’t plan my ends well enough, and they ended up short and awkward. I originally had long pieces of yarn, and I cut them short thinking I would have a full little end of yarn pieces of all different colors. But with the wool, it jus tlooked messy. So I decided to braid them, which I thought looked much better. Problem was…I had already cut them all! And I was too lazy to thread more yarn in that was longer.
So pick what you want to do before cutting! If you want to do the braids, you will need to just add a few more strands of yarn of each color on each end, and then braid them together!


‘
ENJOY!

I Heart Faces: Oh So Silly!
This week’s photo challenge is “Oh So Silly!”
You would think I have more of these pictures to submit…but usually when R is being silly, I’m busy laughing!
But this is her being her usual self while playing on the swings =)

Check out some other great entries here!

My tree Skirt
Did I ever show you guys my tree skirt?
‘
I know it is a little late, but thought – better late than never! I have been so busy with work and guests over the last month that I brought on some early contractions and had to be on bedrest for a while (yeesh – not easy!). Things are better – I guess my body really did need rest – so I finally got around to taking some pictures of the skirt.
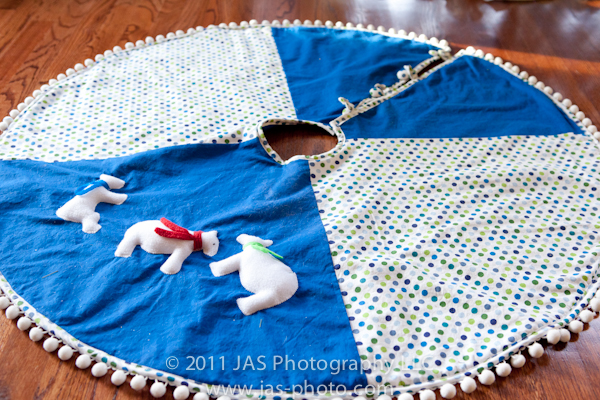
Our tree colors this year were blue green and silver, and since we had all our family over for christmas, I thought it would be nice to actually have a tree skirt instead of just a white sheet piled up around the base of the tree!
‘
Well I looked and looked, but didn’t find a tree skirt that liked…that didn’t cost an arm and a leg. So of course, my next thought was…I’ll make one!!
Needless to say, I now understand why they are so expensive. Not that they are complicated, it just took a long time!
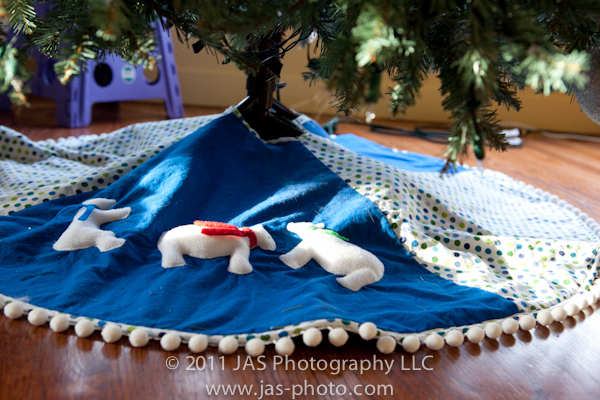
So here is my finished product. I went with blue and green of course, and used my husband’s suggestion of white polar bears as a decoration piece on the skirt.
‘
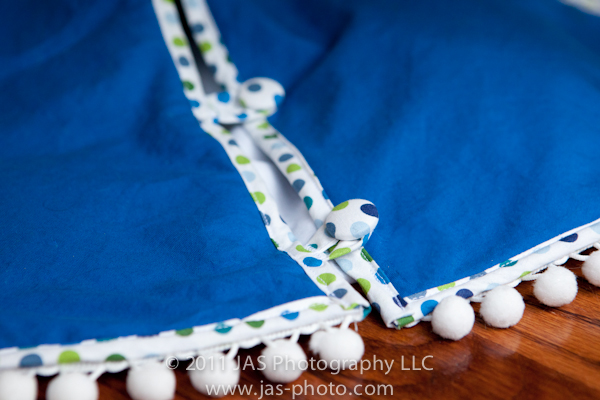
I made bias tape for the first time! That was a day long project in itself, but definitely added an extra touch to the skirt. Will I make more again?? Umm…not for a while!
The fabric buttons were probably the EASIEST part of the whole project. I had no idea how easy they are! So that was a fun discovery =)
‘
And the little trim along the outer edge was of course, something store bought. I was afraid to add it thinking that it may be too enticing for the cats to play with, but they were pretty good!
How did I make it?
I went online and looked at lots of different people’s tutorials on how to make tree skirts, including soe YouTube videos, and then I kinda fudged it as I went along. I used quilting cotton for the top and bottom (the bottom is plain blue). I used fleece for the lining to make it more substantial feeling.
Basically I just made the 4 panels for the top, I made one big circle for the bottom, but actually sewed 4 seams down the 4 points so that it would match up with the top. Once I had my two circles done (i.e. top and bottom), I pinned up the top, bottom and fleece. I sewed around the outside edge and then turned it right side out. This last part was a little tricky because I kept setting up my peices in the wrong order. I wasn’t used to working with 3 layers instead of just two.
‘
Once it was right side out, I sewed the bias tape around the outer edge and inner circle. Before sewing bias tape on in the cut seam where the buttons are, I made 4 button holes where the button straps would come out, and then sewed those in place at the same time (I used bias tape for the button straps as well).
Then I sewed on the outer fuzzy ball trim and the fabric buttons – and it was done!
I know, not a detailed description, but I figured it could give you a general idea of what is involved. So in case you feel like preparing for next year…ha ha just kidding!
Make A Childs’ Day: Donate your Hair =)
Shortly after I got married, my mom was diagnosed with breast cancer. Actually, she was diagnosed shortly BEFORE I got married, but didn’t tell us until afterwards so that it wouldn’t “ruin” our wedding. Go figure – that’s a selfless mom for you. Thankfully, we were (and are) very lucky, as she has been fortunate enough to fight it off for 9 years and counting!
For some time, I felt like I needed a way to show my thanks for how fortunate we were with my mom’s experience…and then I heard about Locks of Love.

It is an organization that takes donations of hair to make wigs for children who have lost their hair to chemotherapy and can’t afford a wig. I had no idea, but apparently wigs are extremely expensive! So, there are many people who can’t afford them after their rounds of chemotherapy. So as a thank you for my mom, I grew out my hair and donated it in residency – and it felt great =)
Recently, I went several months without cutting my hair (more out of lack of time than anything else) and decided I would let it grow out again so that I could donate it. I was hoping to donate it on my mom’s birthday, but it wasn’t long enough by then.
Finally last week it was, so I took it to the chopping block. And here are the results:

No, this is not a furry animal as my husband keeps saying…it is my ponytail.
This is be before (and pregnant!)

‘

And this is after! Now granted, this is with my hair blow dried from the salon, so it does NOT look like this on a daily basis. In fact, it doesn’t look that great without styling at all. But, it is a lot easier to deal with than that LONG mess!


If you want to donate your hair, it is really easy! Once you have it long enough (you need a 10 inch ponytail from tip to tip), go to a salon (any one works) and have them put a rubber band around your ponytail and cut ABOVE the rubberband. It is very important that your hair is CLEAN and in a ponytail when it is cut. They can’t take hair that is all separate.
Then go to the Locks of love website, print out the hair donation form, and send it in with your hair. Your hair should be in a the pony tail, in a plastic bag, and wrapped in bubble wrap or packed in a padded envelope.
Then send it to the address on the site and you’re done!
So go ahead, make a child’s day!
Daily Post Weekly Photo Challenge: Simple
This picture is about as simple as it gets…but I like how it always makes me feel like summer (or maybe it just reminds me of my summer beach trip when I took the picture?).
Especially these days!
‘
I Heart Faces: By The Book
This week’s photo challenge at I Heart Faces is “By the Book”
This is my little one (soon to be big one =) super excited about magazines that have come in the mail. I think these particular magazines were medical journals that I didn’t want to read. Yes, she find joy in all kinds of magazines!
‘
Check out some other great entries here!
PTOW: Making a Year-End album more manageable
PHOTO TIP OF THE WEEK:
How to make the huge task of making a year end photo album more manageable!
This is the time of year when I start to think: “I REALLY should make a photo album for last year…”
But I never get around to it because it feels like such a daunting task!
A couple of times I have sat down to pick out pictures, but again, it becomes overwhelming and I end up not getting very far.

So this year, I am trying a few different tactics.
1) I am making a collection SET in Lightroom for my year end albums, and then collections within that for each month and significant event.

As you can see below, I haven’t finished yet, but in just a couple of days, I am up to Halloween! For some reason, it just makes things stay much more organized in my mind if I am picking pictures by date.
Part of what makes this so easy, is the way I organize all of my pictures…which is also by date. This way I can always find what I’ looking for very easily.

It is important to note that when I import pictures into Lightroom, I do NOT let Lightroom automatically arrange my pictures by date. When it does, it organizes them by each individual day, which is not as useful for me. Instead, I make a new folder with the date and then title of the event. You can see what I mean below:

A couple of tips for this method:
My first level of organization is year. So within the Pictures folder, I have a folder for each YEAR.
Then within each YEAR’s folder, I have a folder for each event. When I name a folder, I start with the year, then the month (2 digits! otherwise they will be listed out of order) and then day and name of event.
Also, I keep a folder for each month labeled “kids” where I put misc pictures that I’ve taken of either my or my friend’s little ones, as well as a generic month folder labeled just with the year and month for misc pictures I take for fun. Lastly, I keep a Misc folder for the year (2012 Misc) for other screen shots or pictures that I’m not sure where to file.
All in all, this makes finding pictures a snap!

Ok, back to my album of the year plan. Since I keep my pictures organized by date as above, it is pretty easy for me to go to each folder, pick out which pictures I like best, and move them into a collection for that month. My plan is to make a photo album that has 1-2 pages per month and per significant event like birthdays or vacations.
Ok, so for my second tactic for tackling albums:
2) I am making my pages in photoshop as JPG files, and then I will use an online album site to publish each JPG file as a page. To do this of course, you need to make sure that whatever site you use has an option to put one JPG picture as a full bleed for the whole page in the album.
Some advantages to this method are that
1) you don’t have to spend time uploading all of your pictures to a particular site and
2) You are not limited by an internet connection/server to make your album. You can make it in the comfort and speed of your own hard drive and CPU and then upload your finished pages.

There are several programs out there that you can buy and download to your computer to make photobook pages, and then upload your pages as I mentioned before. But most of the ones that I found are in the $150-400 range which I did not want to spend.
So instead, I found some digital templates for photobook pages to use in photoshop and downloaded those. I looked around for a bit, and ended up buying from The Album Cafe:

Where you can buy and immediately download entire album templates. Most of these are geared towards professional photographers who need to make albums for weddings, or senior photos etc, but I found that I like their templates and you can edit them as much as you want!
So I downloaded the soft and sweet collection

and have been making more and more templates out of those. It has been working great so far!
If you are relatively savvy with photoshop, you can look online at other photobook layouts that you like, and edit a template that you download to match that!

Well – that’s my tip for this week (and I guess the last several weeks since it’s been a while since I have put one up!).
Hope it motivates some of you to make your own album and take advantage of many of the January sales the photo sites are having!
I Heart Faces: Family Fun
This week’s photo challenge over at I Heart Faces is FAMILY FUN
Here is my contribution!
‘
Check out some other great entries here!
Hope everyone had a GREAT weekend =)
I don’t know about you guys, but my little one is in LOVE with The Little Einstein’s.
So for her 3rd birthday, I did a Little Einstein’s themed party for her and a few friends.
For some reason, it is not easy to find Little Einstein’s stuff out there, so I thought I’d share what I did to make it work!
In this post you will find details on:
Decorations (including where I got everything)
Activities for the kids …and…
Tons of free downloads for you to use in your party!
And if you are looking for an Elmo party page – click here!

So lets start with
Decorations!
My decorations were actually all centered around my main activity for the party, which I have described below. The main source of inspiration for this activity came from another mom and her party – which I then tailored to fit what I had in my house and what i was able to find in the stores. You can check out her description here. But basically, the kids went on a mission to 4 different places: Antarctica, India, The Atlantic Ocean and Africa.
So for decorations, I had a room for each place, as well as my hallway decorated as the sky and part of it as space.
Whenever possible, I used plastic table cloths to put on the walls with matching colors according to the place, and I also got some rolls of paper with things printed on them. I also bought cutouts and stickers to decorate each room.
**I’d like to also make one more note: I think i got a little carried away (surprise surprise!) with these decorations. For young toddlers, like my 3 yrd old, I think she would have been perfectly happy with VERY simple decorations to get the point across. The activity is what was more exciting. So don’t feel the need to go overboard! BUT for older kids, like 5-6 year olds, I think this level of decoration is great because they notice details! Also, there is NO way I could have gotten all this up if I didn’t have help! So definitely make adjustments according to how many hands you will have on board to help get the place decorated!

I bought the majority of my supplies from
1) The Dollar Store
2) A local Parent-Teacher Store
3) Target
4) Amazon.com
5) A local craft store (AC Moore)
So let’s go room by room…
AFRICA/SAFARI ROOM:
Supplies:
1) Green plastic table cloths from the dollar store.
They didn’t have plain green, but they had a football section in preparation for the Superbowl, so I bought their grass/astroturf tablecloths. I put these on the walls to help color the walls and make it feel green. The big key here, is get them from the Dollar Store ($1 each) not other stores ($3.50 each!).
2) Monkey and other animal cut outs from the Teacher Store …and…
3) Jungle themed wall decals from the dollar store
I actually bought much more than you see here, and ended up not using all of it (yay for returning and getting money back!).
‘
As you can see above, I covered the TV with one of the tablecloths.
‘

I made some trees to put up around the room and made some vines to hang from them.
4) For the trees, I bought brown Kraft paper and green posterboard from the craft store.
Very roughly, I drew tree tops on the poster boards and cut them out. I actually used my rotary cutter to cut them out, which I found to be MUCH easier than using scissors. Then I used the craft paper to make the trunks. Nothing fancy! I just taped the brown paper to the back of the tree tops.
5) I used rubber shelf liner from My House =) to make the vines (except what I had at home was gray).

I just cut them into strips and then tied them together. Then for a fun touch, hung some of the monkeys from the vines!
‘
INDIA ROOM:
This was a simple room to set up since I had most of the supplies in my closet!
1) Fabric – Saris, scarves, shawls (from my closet) to put up on the walls.
You can also find fake pashmena shawls from the Five Below store which could work.
‘
2) Paisley wall decals from the dollar store
I put these on the walls, the mirror, the fabric itself. This would be a great way to spruce up some simple one colored shawls!
‘
3) Since we have Tablas at home, and 4 kids that were coming, I set up 4 tablas on a long sari.
If you don’t have tablas, no problem! My original plan (until my hubby remembered the tablas) was to have play instruments out from R’s toys. She has some rhythm sticks, drums, a guitar, saxaphone etc. So I was going to put out 4 of those for them to play with.
‘
ATLANTIC OCEAN/UNDER THE SEA
‘
One of our rooms was supposed to be under the ocean.
1) Underwater paper – I found at the teacher store which I put up on 3 of the walls.
2) I also bought lots of fish and sea creature cut outs from the teacher store.
3) Blue streamers – Dollar store.
‘
I basically improvised with the streamers, and then put the paper up on 3 of the walls. I used the cut outs to put up on the paper to make it feel like the ocean.
I also bought blue plastic tablecloths from the dollar store that I was planning on putting on on the ceiling to make it look like we were below the water surface….but it was 4am when we finished decorating (we started at 2:30am…) so I gave that part up!
4) Music note cut outs – from the Teacher Store
These have to do with the activity – which I have described below.
‘
‘
‘
ANTARCTICA ROOM:
Sorry, I don’t have many pictures of this one…but it was also a simple one.
1) White plastic table cloths – The Dollar Store
2) Snowflake cut outs from the teacher store
You could also print out penguins, and other polar creatures from the internet.

SKY/SPACE
I think this might be my favorite part of the decorations! In fact, we still have all of this up and every day R loves it =)
1) Sky/cloud paper from the teacher store
2) Cutouts from the dollar store: Suns and rainbows
3) Cutouts from the teacher store: Small planets, stars and clouds, and a large rainbow, sun and moon
4) Planet wall decals from the dollar store
5) Dark blue wrapping paper – from my basement =)
‘
We made the two long portions of the hallway into the sky, and the middle foyer/entrance area into space.
For space: We strung the stars from yarn (the one I don’t really care for) and hung those from the chandelier in the foyer. Then we put the wall paper on the walls to make it look like space, and taped the planet cutouts onto it, as well as stuck the planet decals on the paper and front door. Lastly, we hung the large sun and moon in the entrance as well.
‘
‘
‘
For Sky: We strung all the clouds on individual pieces of yarn and hung those throughout the hallways. We also put the cloud paper on the walls. The paper was 48 inches tall, and cut it in half (while still rolled up) so that we would have more of it. Then we put all the small rainbow and sun cut outs on the walls on the paper. We also hung the one rainbow from the hallway.
‘
‘
‘
FOOD DECORATIONS
For the food decorations, I made cupcake toppers for the cupcakes.
‘
I tried to find Little Einstein paper products, but no one had them, except for some sellers on Ebay. I did not start planning early enough to buy from them – so if you are planning early enough – grab a party pack! They usually have plates, napkins, table cloths, cups, party hats and balloons.
If you are in a RUSH – you can still have fun decorations. Sorry, I don’t have pictures! Here’s what I did:
1) I used red and yellow paper plates, cups, napkins and utensils – all from the dollar store.
If you saw my elmo party post – I have gone to MANY different stores (including the dollar store, target, party city) and found that the Dollar Store had the best prices.
2) I printed 2×2 Little Einstein stickers and put them on the paper cups – just to add a little pizzazz.
Here is a very POOR quality picture of the cup…

And here is a free download of the stickers:

Click on the picture to download a PDF of these stickers to print for your party! Print on label paper to make stickers or print on card stock to make gift tags!
For the cupcake toppers, I made stickers using Avery 1.5 inch labels, and then used a 2 inch scalloped circle paper punch to cut out red cardstock. I bought wood picks from the craft store (I found that flat picks work better than round toothpicks) and put a sticker on each side, with the wooden pick sandwiched in between.
‘
If you are interested, here is a free download of the cupcake toppers!

LITTLE EINSTEIN CUPCAKE TOPPERS. Click on the image to download the PDF
For the table, I bought Little Einstein’s party hats (one of the few things still available!) from Amazon.com, as well as some other fun colored hats from target. I put those all out on the table around the cupcakes. I also bought generic birthday blowers (?) – I don’t really know what they are called – but the kids loved them. And these didn’t make noise…so the parents loved them too!
I also got music note stickers and put them all over the table cloth. Come to think of it, you could put these on the cups and other things also!

Little Einstein’s ACTIVITIES
ROCK BAND
For a small opening activity, I put out ROCK BAND for the kids to play. I figured this would go well with our music themed Little Einstein’s party!

So we put out all of the decorations, I put the game on “No Fail” and I let it put on a random setlist. These two settings are essential! That way the kids don’t get frustrated when they keep failing out of a song, and the set list lets them keep going without you having to go back and set up a new song each time. It is a little bit tedious at first to get all the players signed in and all of them set to “easy”, but once you do that, you are golden!
LITTLE EINSTEIN’S BIRTHDAY MISSION
So our main activity was a mission that the kids went on. As I described above in the decorations section, we made 4 location roms: Africa/Safari, Antarctica, India and the Atlantic Ocean in addition to our hallway/foyer which was the sky and space. My ideas for the mission came from this website – which I then tailored to what I had and what I found in the stores.
Basic concept:
The Little Einstein’s wanted to come to R’s birthday party to sing her happy birthday. But along the way, they each character lost one of their “tools,” and we had to help them find each one so they could make it to the party! I gave each child a favor bag with a sticker on it (see below for free downloadable favor bag stickers) and a homemade little einstein’s coloring book (see below for coloring book download). We told them to take the bags with them on their mission to collect all their tools (aka favors) inside.
First we explained the mission to the kids, got in rocket and flew to Antarctica. In Antarctica, we found that the whales borrowed June’s ballet slippers. So we had to go there and dance our hearts out to get the whales to come back so June could have her ballet slippers back. I basically had the room decorated, and had stuffed whale toys (from the dollar store) with a print out of ballet slippers (see bottom of page for image) tied to them. I kept the whales hidden and ast eh kids were dancing, I threw the whales out into the room and they caught/picked them up.
Then we flew rocket to India. When we got there, we took off our hats and scarves and put on Indian shawls. We found that in India, the elephants borrowed Quincy’s harmonica to play in a parade! So the kids had to play the tablas (or any other avaailable instrument) really loud to so that the elephants could hear them and come back to give quincy his harmonica. I found little stuffed elephants at the dollar store, and bought harmonicas online at amazon and tied them to the elephants. Just like in antarctica, I had the elephants hidden and as the kids played, we brought the elephants out one by one and made them dance towards each child.
Next we flew rocket to the atlantic ocean, where there was a bag with ponchos for them to put on so they wouldn’t get wet in the ocean. There were also inflatable plastic microphones for them to use to sing. In the ocean, we found that Annie lost her music notes to her birthday song and they were floating in the ocean with the fish. So the kids had to sing into their microphones and find the music notes and collect them for Annie in their bag. Originally, I had planned on making an oversized sheet of paper with a blank set of music lines on them for the kids to tape their notes to. But that fell through…but you could do it if you have time!
After the ocean, we went back tot he sky to climb into rocket but found that rocket was lost!! We found out that Leo was in Africa trying to find rocket. So the kids all ran over to the Africa room, where there was a bag with safari hats (actually $1 cowboy hats from the dollar store) and sunglasses for them to put on to protect them form the hot sun. When we went into Africa, they had to pat, pat, pat faster and faster to get rocket to fly back to them as fast as possible. So I stood in front of them and led them in the patting and had the stuffed rockets hidden away. Then while we were patting, I had the hubby fly out the rockets to give to each child.
MISSION COMPLETE!
Supplies for the activity:
1) Something to present the mission to the kids.
This could just be YOU saying it all, or it could be a poster board. I used a powerpoint on my laptop because my cousin graciously volunteered to make it for me!
2) A bag labeled with each place name and map
See bottom of page, I have included the images I used for the maps. For the bags, I just used old grocery paper bags with printouts of the maps taped to them as well as printouts of the place name.
3) Antarctica room bag: hats and scarves for each child
Of course you can use what you already have for this. I used both kids and adults hats and scarves. If you don’t have enough, you could get stuff from the dollar store.
4) Antarctica room activity: Stuffed whale with a printout of ballet slippers tied to it for each kid. I also had a soundbite to play in each room off my phone – so I searched online for whale sounds and used that.
This of course is something you can tailor to what you find in the store. I happened to find whales at the dollar store, so that’s what I used.
5) India room bag: Scarves/shawls for each child to wear.
6) India room activity: Stuffed elephant with a harmonica tied to it. Soundbite: Any song with tablas or that is Indian sounding.
Again you can tailor #6 to what you find in the store or online. I bought the elephants from the dollar store and the harmonicas from amazon.
7) Atlantic Ocean bag: Ponchos (2 for $1 in the dollar store) and inflatable microphones (I bought from amazon)
8) Atlantic ocean activity: Music note cutouts from the teach store (or you can print them out yourself) and tape to ocean paper decorations.
9) Africa room bag: Safari hats and sunglasses (I bought each hat for $1 and a pack of 4 glasses at the dollar store)
10) Africa room activity: Stuffed little einstein’s rocket (I bought that from amazon as well)
11) Foamboard rocket: 2 pieces of red foamboard and a b;ack marker to draw rocket.
See below where I have put the 2 mirror image graphics that we used to draw both sides of rocket onto the foam board.
Here are some pictures to show how the activity went!
As I said, my cousin made a short and VERY SIMPLE powerpoint that explained what the mission was. We gathered everyone into the foyer and showed them the ppt During the presentation, we played the Little Einstein’s theme song to get them in the mood!

Then we all assembled the crew in the sky to fly rocket to antarctica. We made these boards (see below) to represent rocket and basically had the kids get in between the two boards and pretend they were going to blast off.

I forgot to do this part, but I would tell them to 1) buckle their seat belts, 2) pat, pat, pat faster and faster to give rocket enough power to blast off!
‘
Here are the mirror image pictures we used to guide our rocket drawing. If you want to make this more elaborate, you could use yellow and blue construction paper for the headlights and engines as well as the windshields. We decided to go simple, and it worked just fine!

You can use this image as a reference for drawing your own rocket onto posterboard or foamboard. I have mirror images of them so you can draw both sides more easily.

You can use this image as a reference for drawing your own rocket onto posterboard or foamboard. I have mirror images of them so you can draw both sides more easily.
This is us trying to assemble everyone into rocket to fly to our first mission location.

Once we had everyone flying in rocket, we went to Antarctica!
You can see all the kids putting on their hats and scarves. They were so cute!

Once we went in Antarctica, we started playing the whale music, and the kids started dancing around and around, and eventually we brought out the whales with the ballet slippers!

Then we flew rocket to INDIA! Where the kids took off their winter gear and got dressed in their India scarves.

Then inside India, the kids had so much fun playing the tablas and calling the elephants back!

Once everyone had their elephant and harmonica safely tucked away in their favo bag, we got into rocket again and headed for the Atlantic Ocean!
When we got there, the kids donned their ponchos and got ready to sing with the microphones.

Next they sang to the fishies in the ocean and then collected music notes for annie in their bag!

Lastly, we ran to Africa to help Leo find rocket! The kids put on their hats and sunglasses…

Then they patted their little hearts out until each of their rockets came back!

That’s it! Mission complete!
This was their completed favor bag with all their goodies. The only thing missing from the picture is their coloring book!
‘
I know this is a lot of stuff, but since I only had 4 bags to make it wasn’t that bad!
FREEBIES
Here are some free downloads for you:
Favor Bag stickers
Colorbook PDF + Colorful cover
Cupcake Toppers
Various Little Einstein’s pictures I collected in my search that you can use
Maps of Africa, India, Antarctica and an Ocean image to use
FAVOR BAG STICKERS. Just write in your little einstein’s name on the sticker. You can print them on label paper and stick to your bags, or print on regular paper and tape to the bags.

Click on image to download a high quality image to print
COLORING BOOK COVER: Print on a regular letter size sheet of paper or cardstock

COLORING BOOK PAGES: This is one PDF file of 5 coloring book pages. I wanted to keep it small and simple, so that’s why there are so few!

2×2 PDF of LITTLE EINSTEIN STICKERS to use for decorations
CUPCAKE TOPPERS
LITTLE EINSTEIN CUPCAKE TOPPERS. Click on the link above the image to download
LITTLE EINSTEIN’S IMAGES
‘
‘
‘
‘
‘
‘
‘
‘
MAPS/PICTURES FOR SUPPLY BAGS FOR EACH ROOM
‘
‘
‘
‘
‘
‘
