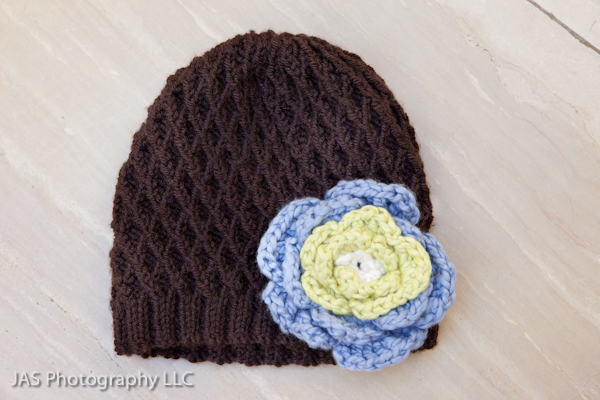
At long last, a hat for me =)
As I mentioned earlier, I usually use knitting and sewing as an excuse to make gifts for people, but recently I decided to make myself a hat! I think for the first time! I started off planning on crocheting a hat – since I had never done that before. So looked around online for a cool pattern, and found one with diamonds, similar to the pictures you see here (except these are knitted). But the pattern was SUPER complicated – much more than I could do as a novice crochet-er. Well, I probably could have done it, it just would have taken a LONG time and I would have to look up a lot of new terms and how-to videos on youtube. I was going to do all that, until I saw that the crochet pattern was actually based on a pretty famous knitting pattern by Jared Flood called the Koolhaas Hat. Turns out it is not a free pattern…and I rarely buy patterns (you can find SO many free ones that are great too!). But I really liked it, so I took the big $5 plunge. =)
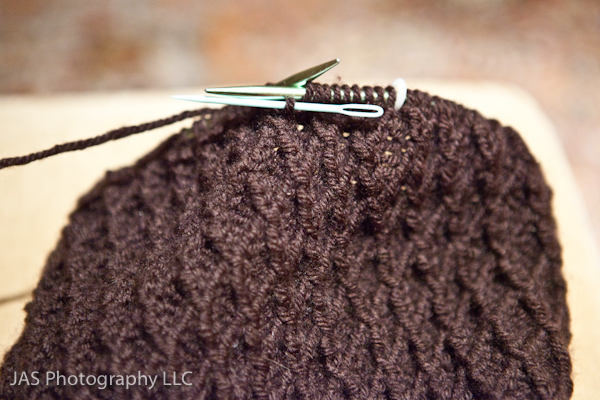
Well, turns out the pattern is actually pretty complicated, which when I’m knitting, is great because it keeps it interesting, and I get to learn some new skills. (sorry, i have a problem with run-on sentences) Anyways, here is the hat most of the way done. It is basically a TON of cables that crisscross back and forth. The pattern also uses a chart for the main pattern, which I had never used before (TIP: If you are working in the round, you read charts from RIGHT to LEFT on each row. If you are working on regular needles, you read them R –> L, then L –> R and keep switching off).

The instructions say to use a cable needle for the cabling that you have to do on every other row, but I found it much easier to just use a tapestry needle. Each time you cable you only have to cable one stitch at a time, so you dont need a long needle. AND, it is so small, that it is easy to hold in your hand during the stitches that you are not cabling. I thought it worked really well.
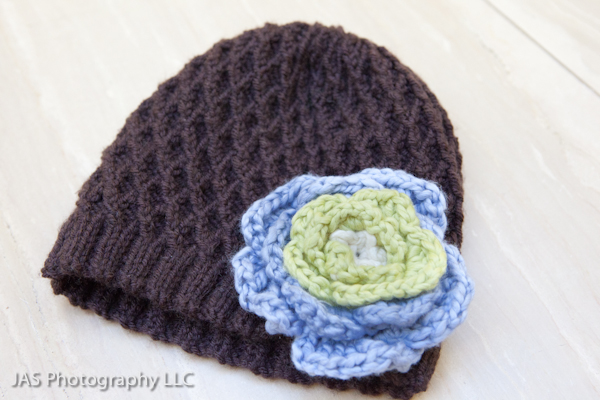
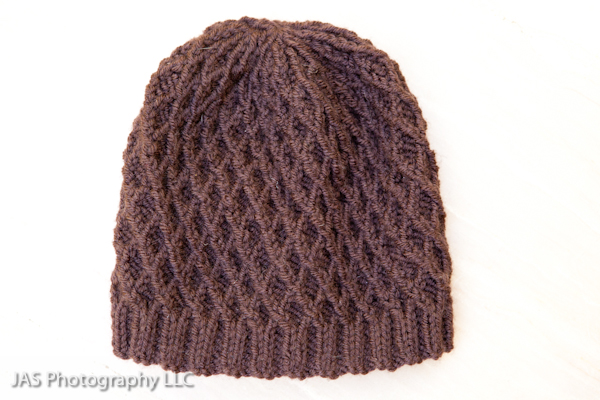
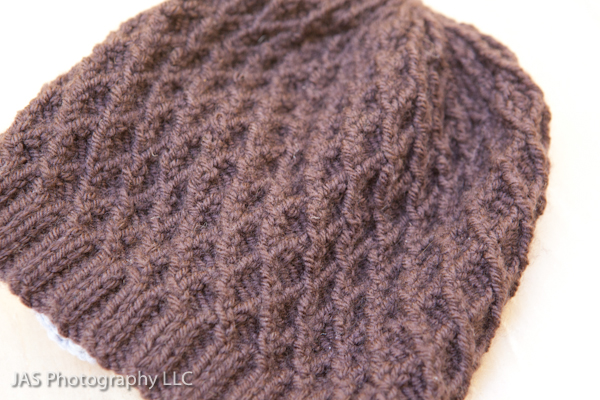
This is the finished hat. To be honest, my impatience got the best of me, which is why I ended up with a brown hat (I’m usually into brighter colors). One night a couple of weeks ago I basically decided to make the hat, found the pattern, and then wanted to start right away! When I looked through my stash of yarn, I found that I didn’t have many options in the right weight yearn. So without knowing how complicated the hat was going to be, I figured I would make one with the brown for the hell of it (a present?) and then make another one for myself with a color I really wanted. Well, once I got started, I decided it was taking too long to make another one any time soon (I dont usually like to be tied down to one project for too long). So i ended up keeping the brown hat, and embellishing it with a flower!
I have only crochet’d a couple of flowers before, but I like this one the best. Unfortunately once I made it, I thought it was WAY to big – likely because I just wasnt used to seeing myself with flowers on me…but I think I will keep it as is! HERE is the website where I found the pattern for the flower, and HERE is the website where you can buy the hat pattern. Enjoy!
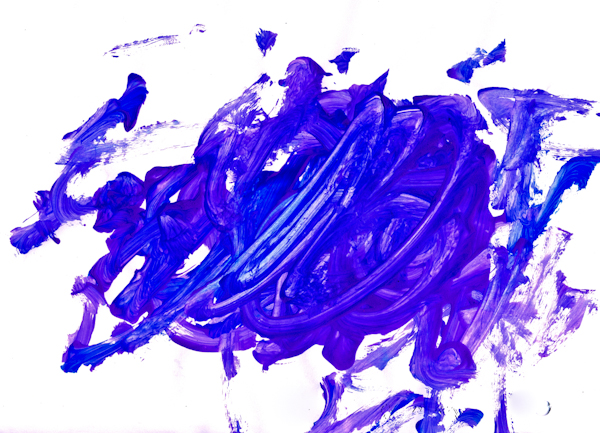
Just another dandelion
Last fall…hmmm…actually two falls ago (!) my hubby bought me a new macro lens for my birthday, which I LOVE. Well, to be honest, I actually exchanged the one he got me for the more expensive L version…that one I REALLY LOVE. =) Anyways, I was looking through some of my pictures that I took right after I got the lens, and just wanted to share today. Enjoy =)


How to preserve your kids' art
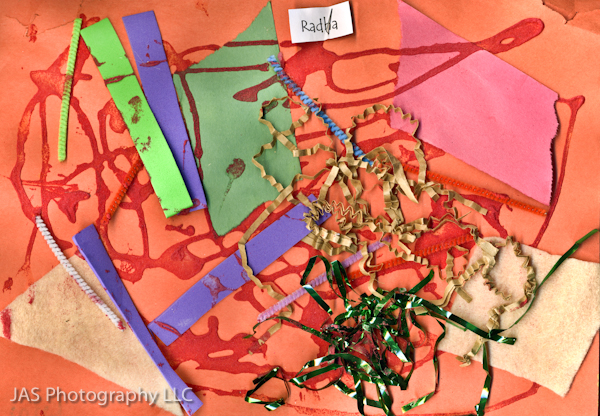
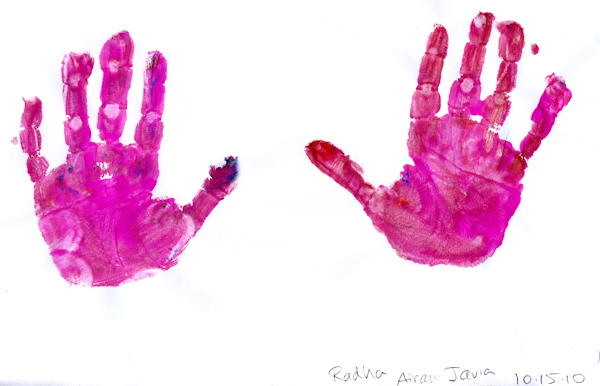
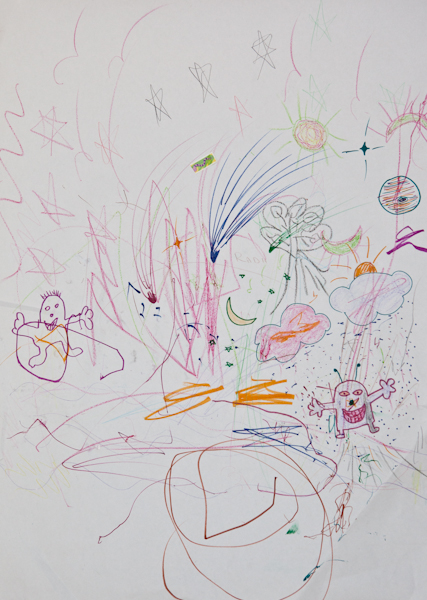
Our kids, nieces, nephews make SO much beautiful art – I’m sure everyone’s’ do! So, the big question was: “How do I preserve this art?” I know that it is not practical for me to think I can physically keep every single piece of art that Radha makes forever…so, I decided to digitally record them. I either scan them (as you can see in the first several images), or I take pictures of them (the last 2 images). This way, I can digitally record EVERYTHING – even if it is just scribble – what is a few bytes (or kilobytes) here and there? And then the ones that I really like, I physically keep. Most of them are likely going to stay in files, but I am planning on getting cork board tiles to put up in our hallway, and display her most recent pieces there all the time. That way she sees that we think they are important and beautiful, and hopefully gets encouraged to do more! Another idea I recently had and am going to try out this week, is making 3×5 or 5×5 prints of some her masterpieces, and turn them into thank you cards or blank note cards! That way I can share her art with everyone and put a special touch on our friendly notes. I’ll put up some pix of those once I get them done!
FYI – if you are scanning the art, here are a couple of guidelines for resolution: If you would like to be able to reproduce your scanned image at it’s original size, then you can use 300ppi. If you would like to be able to enlarge the image – i.e. print an 8×10 from a 4×6 scanned image, then you need to multiply the resolution proportionally. For example, if you are going to make a 8×12 print of a 4×6 image, you should scan it at 600ppi. Or if you are going to make a 12×18 print (or something in that ballpark), you should scan it at 900ppi.
Hope that helps!


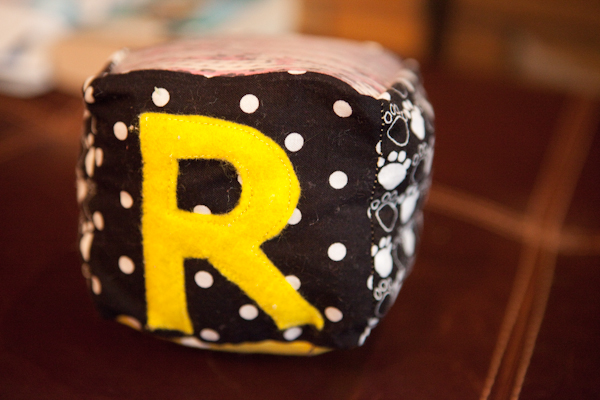
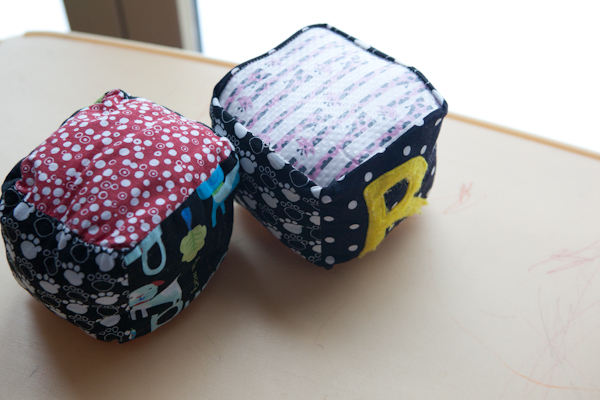
All.Things.Sewing. Stuffed blocks for baby!
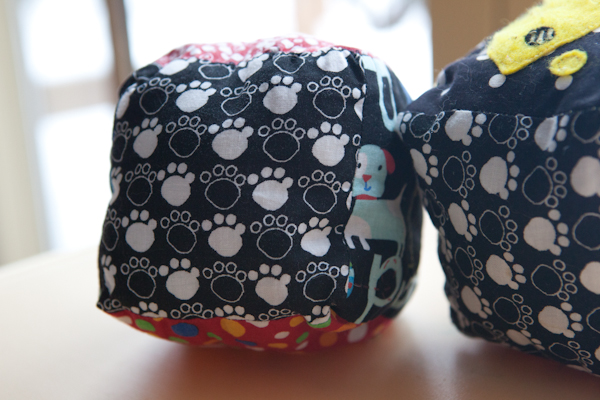
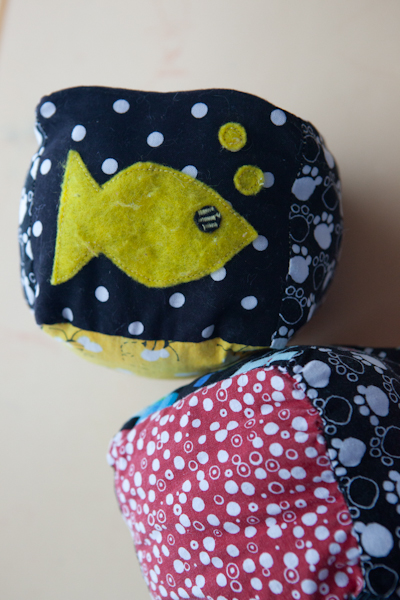
Whenever i see a cute new design or pattern for something to make, i always start trying to think of who can i make it for as a gift. Kind of like i need an excuse (& motivation) to make it. Well, these stuffed blocks are perfect little gifts for babies, baby showers or even for your own kiddos! They are one of the first things i made when i started sewing – which considering i hadn’t had a single sewing lesson ever, should tell you that they are pretty easy to make. The best part is that instead of having to cut your own fabric, you can use charms packs! I had no idea what that was when i first read the blog post about these cubes, so for all you newbies out there, charms packs are little packs of fabric already cut to 5×5 inches, ready to sew! So they are perfect for a project like this! You can also find them in all different patterns and designs. Well, regardless, what you see below is a mixture of fabrics that I cut and put together for these cubes. I then used regular felt from arts stores to ct out and sew on the letters or other cute appliques for the cubes. I also had a plastic, textured shelf liner from Ikea that I cut and put on the outside of one of the layers so that there would be something itneresting for her to touch.
Sewing them is pretty easy. I will explaing it VERY briefy here, but the blog article that I followed to make them is at the “whipstitch blog”
Basically you first sew 4 sides together, with right sides facing together (that is the easiest part). Then you sew the top and bottom on. The corners are the trickiest part, and basically what I did was get to the corner, then lift the pressor foot with the needle still in the fabric, and twist the layers of fabric so I could go in another direction without twisting the fabric into the seam. Worked pretty well! And then the last small seam I sewed by hand after putting in the stuffing. I also put little rattles into the cubes by finding something small and hard, putting some jingle bells or rice or lentils into it, and sticking it in the middle of the cube. That extra sound goes a long way with the kids!

Better late than never!
Today’s topic is something that is a few months late….but I figure better late than never: How to display your holiday cards in a clean, space saving way!
Last summer we moved to a new house that no longer has a fireplace mantle where I can put all the beautiful holiday cards that I get. But to be honest, even that was flawed – we always had trouble with the flat cards, since they didn’t stand up themselves. We use to prop them up on other cards, but inevitably, they would keep falling and you couldn’t see all of them. So a little while back I was asking my friend HP what she does to organize her cards, and she recommended the following, which she saw online (this picture is my finished product!):
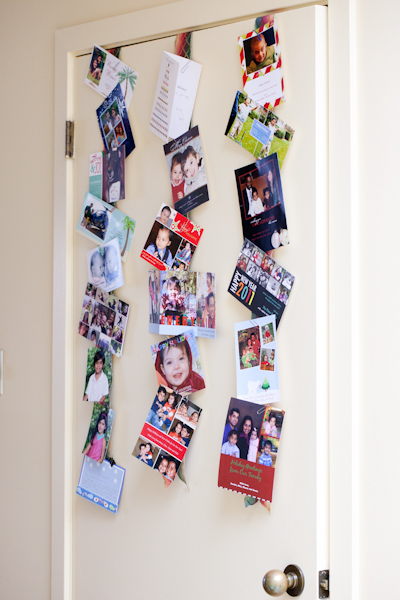 There are several different ways you can do this, but the essential concept is to hang ribbon on a door or wall, and then attach the cards to the ribbon. You could make a lattice with the ribbon, or do it very simply like I did: attach the ribbon with tape to top of your door (the backside) and hang it down the front. I used wide ribbon so that it wouldnt turn and that worked well. I also used really pretty ribbon – but that ended up being a waist since you can’t see any of it! I cut the ribbon at a height where my cats and daughter couldn’t tug at it and left it hanging there (I.e. I didn’t attach it to the door on the front side). As far as hanging the cards – I went the easy route and used what I found in my kitchen: paperclips.
A couple other cool ideas I saw online were: taping the cards to the inside of your cabinet doors so you see them each time you open them and 2) attach a ribbon to each card and use a push pin to attach it to the underside of your mantle (much more time consuming!). You could do variations of what I did, and hang a string or ribbon from anywhere – in front of a mirror, fireplace, doorway – and hang the cards from it
Well, now I get to look at all the loving faces of my friends and family each time I’m in the kitchen – so it really is better late than never!
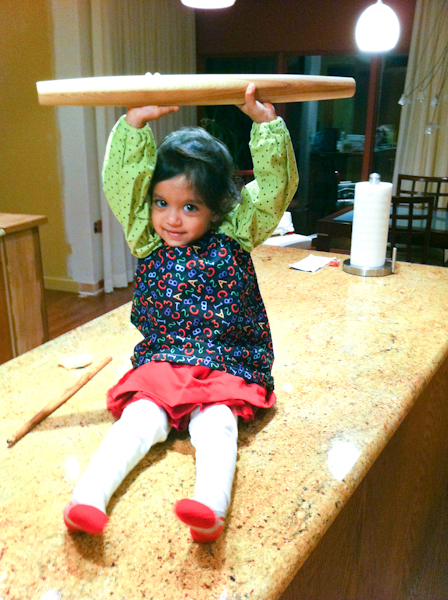
All.Things.Sewing. Toddler's activity apron
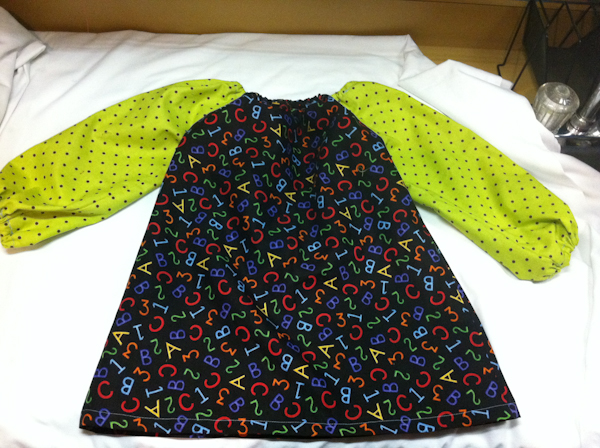
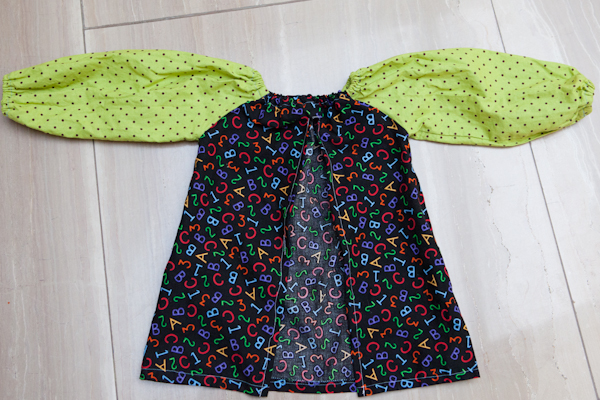
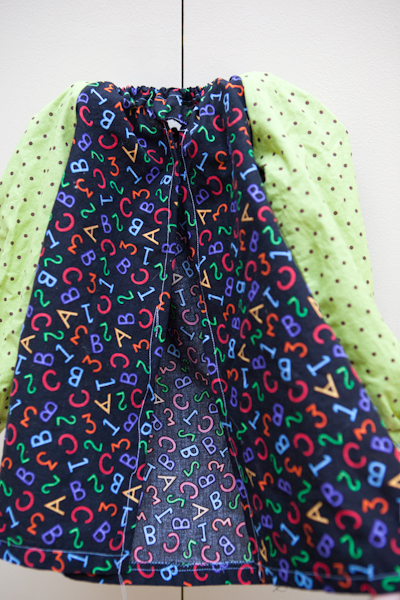
A little while ago I decided to make Radha an activity apron or painting bib for when she paints etc at home. Also for when she is helping me in the kitchen (I try to make cookies with her every now and then since there are steps she can participate in!). I searched for a while online, and came up with two designs that I liked the best. They are both very different in terms of how long they take, but they both have good uses.
The first one, which you can see below, is the more complicated one to make. I found it at this site where you can download the free pattern as well as stencils for the apron and for the cute appliques she made. I did not use the stencils because the size I needed to make was SO much smaller. So what I did was measure the distance on one of radha’s fleece sweaters from the neck like to the shoulder, and compared that to the measurements on the pattern stencils. I figured out what that proportion was and applied the same proportion to the rest of the measurements. This seemed to work well. What I like about it is that it has long sleeves so arms and shirt sleeves stay protected, and it has elastic to put on or take off, so it is easy to use. The other thing I like about the sleeves is that they come all the way up to the neck – this makes a cool design, and makes it much less complicated to sew since you dont have to worry about armholes. However, because it has a full back, it does make it slightly more difficult to get on and off than the second design. That means that it is hard for me to get Radha to wear it when all she wants to do is draw, and not have to worry about the stupid clothes I keep trying to make her wear!
The things I’d do differently with this pattern:
1) I’d put slits on the side so that if you are using it as a cooking apron for a toddler who is going to be sitting on the counter the majority of the time, it wont keep riding up like mine …and…
2) When making the elastic areas, I would first sew the two ends of the fabric together, THEN fold over the 1-inch seam to make the pocket for your elastic. Leave a 1-inch area unsewn, put in your elastic, and then stretch it out and put it under the sewing machine to sew the last bit (or do it by hand…what?!?). In the pattern, she says to sew the ends of the fabric together, but to leave 1 inch if the seam un-sewn – which messed me up. I could very well be reading the pattern wrong…but when I did it as I described above, it worked perfectly well for me =)
Here is the second design. This one is SUPER simple and fast – which makes it great for presents!


I originally tried to put sleeves on it because i wanted it to cover her arms, and you can see the pictures with the sleeves above – but it didn’t work out too well. I have never sewn anything with sleeves before, and didn’t realize how much extra space you have to leave in arm holes! SOOO, after realizing that the sleeves would not go past the middle of Radha’s upper arm, I took them off, and now the main part of the sock is sitting on my table waiting for some TLC. The way I cut the arm holes leaves me no choice but to still try to put full length sleeves on them, but I’ll have to start the sleeves from scratch… BUT here is a picture of the finished product from the design as written. I made these for several friends’ kids for christmas – they were a big hit! (i think!)
What would I do differently about this pattern? Not really much – i think it rocks! Well, I guess the one thing I did do is joint the neck line on the back of the sock so that the elastic wouldn’t show through. But that was no biggie!
UPDATE: Feb 6, 2011
I recently tried puttig this apron on Radha again, and realized that because it is closed form the front and back, it is somewhat of a pain to get on. So, instead of putting slits o the sides like I mentioned above, I put one big opening down the back, and it is now MUCH easier to get on! It works well since you dont really have to worry about them getting their backs dirty!
recipe for tonight
I am trying to motivate to cook more lately (I have a level of PTSD from Radha’s lack of eating which has bamde me not want to cook or even be in the kitchen). I found some great, pre-cut butternut squash, so searched for some recipes and came up with this one from Cooking Light. Just need to go buy some barley and taleggio cheese and will try it out. Hopefully it will be good!

Barley, Butternut Squash, and Shiitake Risotto
Maureen Callahan, Cooking Light, MARCH 2010
Yield: 6 servings (serving size: about 1 cup)
Ingredients
* 3 cups (1/2-inch) cubed peeled butternut squash (about 1 1/2 pounds)
* 3 tablespoons olive oil, divided
* 3/4 teaspoon kosher salt, divided
* 2 cups thinly sliced shiitake mushroom caps (about 1/2 pound)
* 1/3 cup finely chopped red onion
* 1 cup uncooked pearl barley
* 2 garlic cloves, chopped
* 2/3 cup white wine
* 3 1/2 cups organic vegetable broth
* 1/4 teaspoon black pepper
* 4 ounces Taleggio cheese, diced
* 2 tablespoons fresh thyme leaves
Preparation
1. Preheat oven to 450°.
2. Combine squash, 1 tablespoon oil, and 1/4 teaspoon salt; toss well to coat. Arrange squash mixture in a single layer on a baking sheet. Bake at 450° for 25 minutes, stirring once.
3. Heat 1 tablespoon oil in a large Dutch oven over medium-high heat. Add mushrooms; sauté 5 minutes or until browned, stirring occasionally. Transfer mushroom mixture to a bowl; keep warm.
4. Heat remaining 1 tablespoon oil in pan. Add onion; saut´´ 4 minutes or until tender, stirring occasionally. Add barley and garlic; cook 1 minute, stirring constantly. Add wine; bring to a boil. Cook 3 minutes or until liquid is nearly absorbed. Add broth, remaining 1/2 teaspoon salt, and pepper; bring to a boil. Cover, reduce heat, and simmer 30 minutes or until barley is tender and liquid is nearly absorbed. Remove from heat; add cheese, stirring until cheese melts. Stir in squash, mushrooms, and thyme. Serve immediately.
Wine note: The 2008 J Lohr Riverstone Chardonnay (California, $15) is a buttery, beautiful partner for this creamy-textured risotto. Tropical fruit notes, ripe pear, melon, and vanilla aromas combine for a wine that will embrace the rich flavors in this dish. –Natalia MacLean
Inspiration: a scarf.
Inspiration comes in many forms for me: a picture, a phrase, an attitude, a scarf =) Last night while looking up the difference between ssk and k2tog, I came across this blog post about a technically simple scarf to knit, but an absolute BEAUTY to look at. I can’t get over the colors and how they blend from one to another. I also never would have thought of combining those together, but they look so great! I think this may have to be my next project…even before I finish the baby blanket I started a while back… I’m going to have to find a place to by some discounted noro yarn…i do not feel like spending $40 on a scarf!
Take a look at the post – i have put up some of the pictures from the post here – these are ALL pictures by Jared Flood and the scarf he made…which has inspired me.


One of my favorite websites for kids
Radha knows all her letters. That isn’t really that surprising, i think that most kids her age know their letters. But she has been recognizing letters for a LONG time – since she was barely over a year old! My mom introduced her to www.starfall.com – a website for education pertaining to reading and writing. I actually haven’t seen 99% of the website – but I have spent HOURS and HOURS and HOURS on the one section of the website to phonetically teach children their ABCs. It is a flash driven site, so unfortunately doesn’t work on the iPad or the iPhone, but it is AMAZING. You can click on any letter of the alphabet, and it will show you the letter, say it phonetically, and then go through several examples of words with that letter with animations or videos or cute pictures and sounds to illustrate them. Radha has a very short attention span, and since she was barely 6 months old, she would sit through this website for a good 30 minutes! We used to do it once a day, which is why I think she recognized her letters so early on. It was often great in the morning when we were so tired and wanted to go back to sleep, because it required minimal involvement on our parts to keep her entertained, and we could kind of veg for a little bit before we really had to wake up. I felt guilty letting her sit in front of the computer for that long, but she really LOVED it and definitely learned a lot from it! This is actually what I modeled my Hindi Alphabet video (I’ll write about that later) off of. Take a look at the site when you get a chance and spread the word to other parents!

i LOVE this app!
App Name: Lose It!
Ok, for all you people out there that say you don’t know why you can’t lose weight, this app is for you. A couple of years ago, my good friend SS made me realize that losing weight is just MATH. Calories IN have to be less than calories OUT. So that means that you have calculate how many calories you burn in a day – this depends on your current weight, height, age and gender. Then, you have keep track of exactly how many calories you eat in the day (yes, even those small little snacks or treats) and how many calories you burn every day. Well, some of the hardest parts of that are 1)having an easily accessible place to put all of that information, 2) calculating it all 3) figuring out how many calories are in everything etc. BUT if you do this, it really works!! You don’t even have to do any exercise, you just have to adjust how much you eat – i.e. your total calorie consumption has to be lower. So, i took her advice, used the notes function on my phone to track everything, and lost exactly what my goal was, which was about a pound a week – that is a healthy amount of weight to lose that is reasonable to be able to keep off. Then I got pregnant…now here I am, wanting to lose another 15 pounds. Luckily, in the interim, I have found this awesome app called “Lose it!” You enter in what your age, weight and height is, and what your goal weight is. Then it gives you options for rate of weight loss (i.e. 1 pound a week) and then it calculates what your daily NET calorie consumption should be. YOu can then use the app to track what you eat every day, find common foods with their caloric amounts, or enter your own foods and how many calories they have (which it saves for use again later) and you can also enter any exercise yo do for calories burned. You have to get into the habit of looking at the calories in EVERYTHING you eat, and measuring how much you are eating (it is really easy to eat 2-3 servings of cereal and think you are only eating 1). You can periodically enter your weight, and it will give you graphical representations of your weight loss and how that compares to your goal. I LOVE it. Check it out – here are some screen shots:
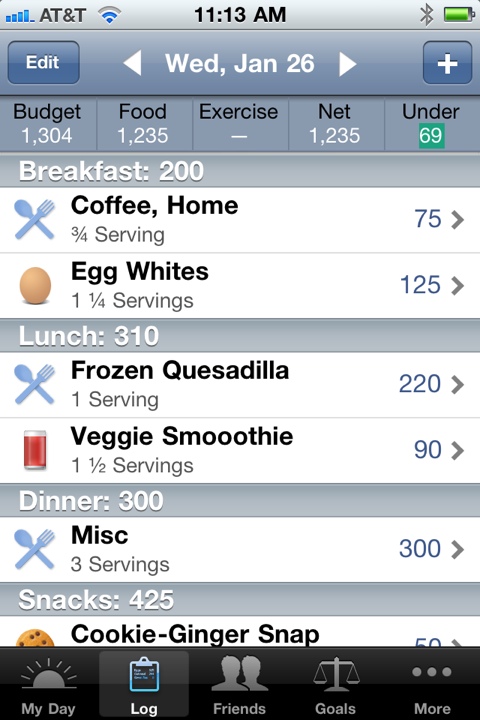
Daily log of what you have eaten. It tracks things by meal and snack and adds those up separately as well so you can see if you tend to eat too many calories in one meal.
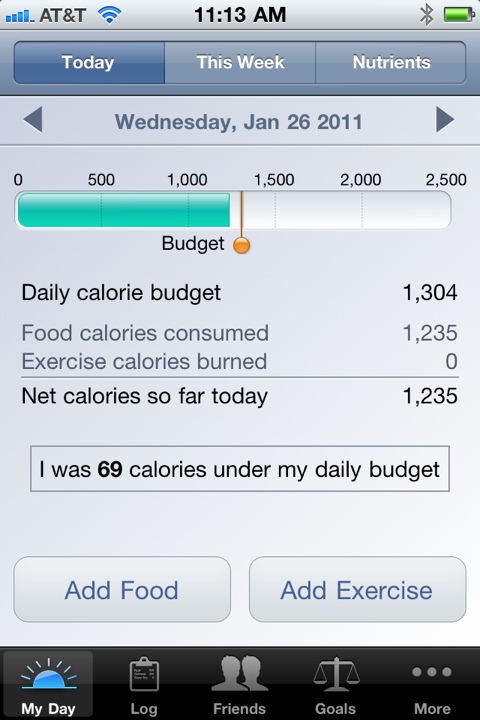
A graphical representation of how much you have eaten compared to your budget for the day.
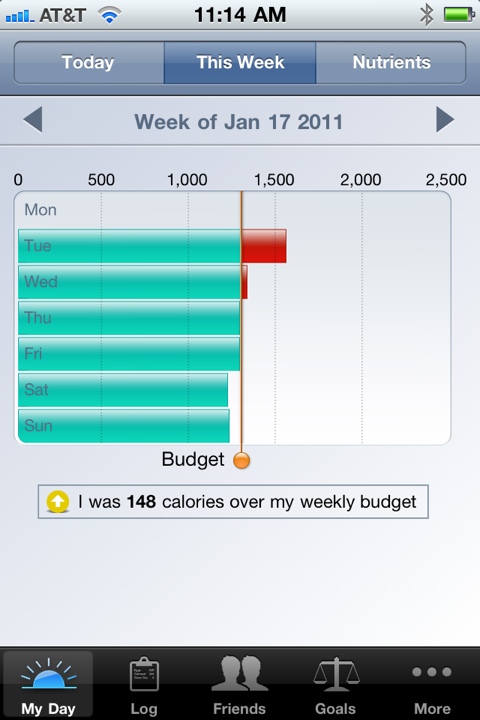
A graph of calories consumed for the week, keeping in mind your daily budget. It also tells you how much you were over or under your entire weekly budget. it is ok to be over a little bit on one day, if you make up for it another day.
This is a screenshot of your list of custom foods or foods that you have used, so you can easily pick from them again and again. It is SO fast!

One more thing to try to motivate you…if you feel like you can’t commit to counting all the calories you eat everyday right now, but would like to lose weight, I would suggest at least starting to LOOK at the calories in the food you are eating, and try to judge what size portion you are eating. For the most part, people tend to eat much larger portions than they should (I try to measure things as much as I can so I know how much I’m actually eating) and we tend to underestimate how much we are eating. However, I really think that if you even look at the calories that are sin something – a cookie for example – you get disgusted when you see how many are in there, and this makes you less like to eat one – or FIVE! Granted there are times that I still eat them and say “I dont care! I want the cookie!” But most of the time, I can’t bring myself to eat things or to OVEReat things once I see how many calories are in them. Try it!
