Italty on my mind
")
The colosseum at night.
i’ve got italy on my mind
")
One of the main streets down the center of florence
In April of 2003, L and I went to Italy for 23 days of glorious honeymooning. It was 3 months after our wedding, but COMPLETELY worth the wait.

Colorful windows in a Roman piazza (near the Pantheon)
I am LONGING to go back! For some reason, I still seem to feel “burned out” from residency…even though I finished it almost 4 years ago and didn’t do a fellowship like most of my peers. I have this need to feel like I am fulfilling and living my life outside of the hospital. Which is one of the reasons I chose to work part time and stay at home with my 2 year old daughter instead. This brings me to my longing for italy – people in Italy seem to truly ENJOY living. They just get that there is more to life than work and work and more work.

The jewish ghetto - just outside the Vatican
They enjoy sitting in piazzas, eating, drinking, cooking, being outside, talking to friends, spending time with family…I could go on.
Ok, I admit, I know VERY few people who are actually FROM Italy, which means that I am probably just restating stereotypes. BUT, I do think that more people in Italy have a passion for enjoying life and actually act on that passion, than people here.

The Positano cliffside
This is why L and I are planning on going back to the country of “I-ate-so-much-gelato-I-no-longer-fit-into-my-pants” this spring for our baby free vacation. Unfortunately we wil hae no where close to 23 days like we did last time (in fact, I dont think we will EVER have that much time again), but we will have a full week.

A church in Sicily
The main focus of our trip: Food, Wine and Dessert. Oh yeah, and don’t forget relaxing, sitting in piazzas..and maybe some sight seeing here and there.

Piazza Di San Marco in Venezia
The only problem: I’m overwhelmed with wanting to go EVERYWHERE and have to find a way to narrow down to 2 cities (max) so that we can focus on staying relaxed and really enjoying the places that we stay in. Top on the list so far: Roma, Firenze (Florence)/Tuscany in general, Milan.
2")
Il Duomo in Firenze (Florence)
I’ll let you know what we decide on!

The Pantheon in Roma
The Best Sound Machine for Baby
Sound Machine: Homedics Soundspa Lullaby (available at Bed Bath and Beyond for $19.99, Target for $30)

A good friend of mine bought this sound machine for my baby shower, and it has been one of my MOST favorite baby items ever. Besides our baby furniture, it is probably the thing we have used most since my daughter was born. In fact, we take it with us on all trips – even if it is just for one night.

What does it do?
1) Make different sounds
– We always use the rain sound, because it is a steady volume, and is easy for us to sleep to when we hear it on the baby monitor.
– But you can also play ocean waves, heart beat (I have never used that one), and also Twinkle Twinkle Little Star and Rock-a-Bye Baby –> both of which have been used heavily in our household lately.
2) Project a moving light show on the wall or ceiling with different scene options including monkeys and birds/sheep & stars etc.
– I originally thought this function was useless. In the very beginning, babies’ eyes can’t even see far enough to see the lights. Then when they can see far enough, I found it to be too distracting. However, now that my daughter is 2 and often needs help calming/winding down before bedtime, I have found this VERY useful! It gives her something interesting to look at. and makes her less occupied with me holding her. So that is a definite bonus!

Why else do I like it?
It is SUPER small and light! I’m sure there are smaller ones, but they don’t do as many things as this one does…and this one is pretty small to begin with. It is very easy to unplug and stick in your suitcase. When we are sleeping somewhere that is more noisy than R is used to, we have found that the sound machine really helps R get to sleep by drowning out all the other noises.
Is white noise bad?
When we were first looking at what to buy for our baby to be, we were reading Baby Bargains, and in their section about noise machines, they mentioned a study that said that perhaps it was not good to play white noise for our children because it could affect their cognitive development. Well, I do not agree with applying the results of this study to babies (this is a non-professional opinion, just a mom opinion). I looked up the study that the book cited, and it was performed on rats (issue #1), who were subjected to white noise 24 hours a day (issue number 2) for a multiple days in a row (issue #3) with no variation in frequency or type of sound (issue #4). All of those conditions would never apply to a new human baby! I will say that we do not put the noise machine on VERY loud, but it is often loud enough to drown out noise coming from right outside her bedroom. But the key is, it is for a short time, and it varies. Whenever we have to put it loud like that, after things quiet down in the house, we go back in the room and turn down the volume.
So, if you are looking for a sleep aid for your child, I would definitely check this out! After two years, we still use ours every night. The only problem we have had with it (literally after 2 years of nightly use) is that the rotator for the light show only works intermittently now. But we still turn it on and let R watch the static image, which seems to entertain her enough!
By the way, this makes a GREAT baby shower or baby’s arrival gift too! Save up those 20% off or $5 off coupons and buy several from BBB!
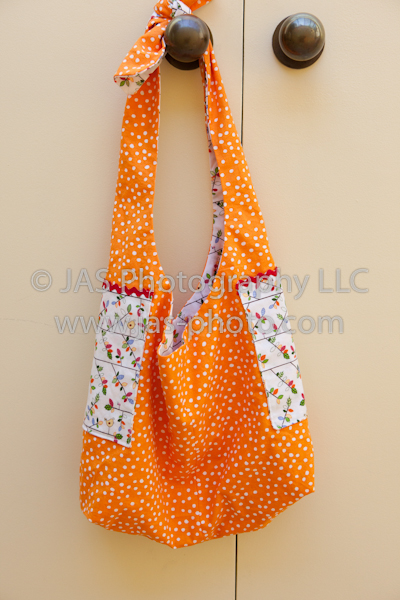
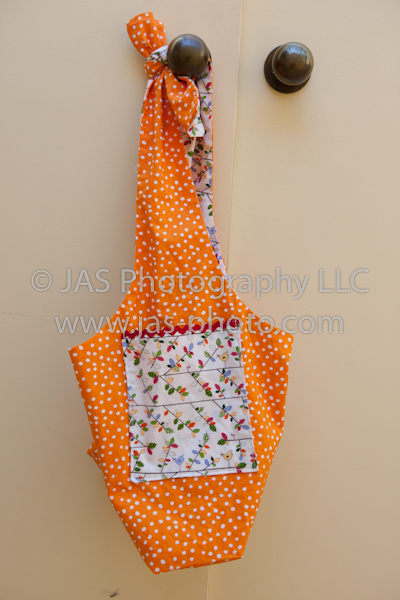
My new purse

Meet my two new purses. Well, they are more like my “everything bags.” They each can serve as an everyday, casual purse, or a toy bag, or a light grocery bag…you name it! I recently mentioned Rae Hoekstra’s awesome blog: Made by Rae – which is where I got this pattern from. She has several free patters on her site…unfortunately this is not one of them. You do have to pay for it, but it is very reasonable ($6!). So, unlike my norm, I decided to buy the pattern, because it looked super cool (and because I like to support fellow enterpreunerial moms!).
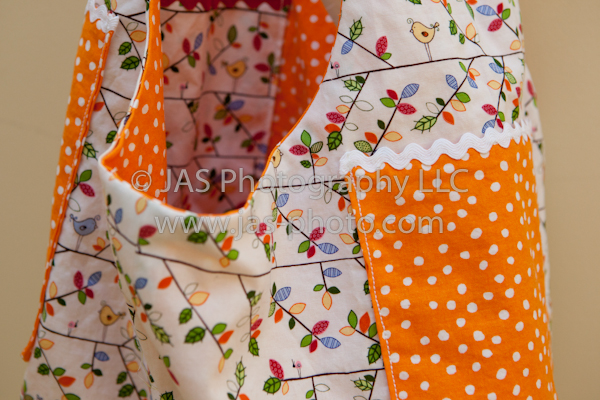
 So these are my results! I didn’t start off planning on making two right away. But I realized that the two fabrics I originally picked (the apples and the orange polka dots) really didn’t look right together. So I cut two more pieces of fabric, and made two bags – which I am totally happy with. One is a more calm, subtle, relaxed bag with light colors, while the other is more bright, and OPEN YOUR EYES colors!
 This was the first time I had ever used Ric Rac – not bad! I like the touch it gives.
 The one thing I found difficult about the pattern, was sewing the cross seams on the edges of the bottom of the bag. Well, the difficult part (or maybe I should say “tricky”) was getting that seam to be perpendicular to the main midline bottom seam. On two of my four fabrics, I ended up making very lopsided and slanted seams – doesn’t look so hot. But on my second go around, I did a much better job. I guess practice really does make perfect.
 If you like what you see, check out Rae’s blog, buy the pattern and then make one for yourself and a friend too!
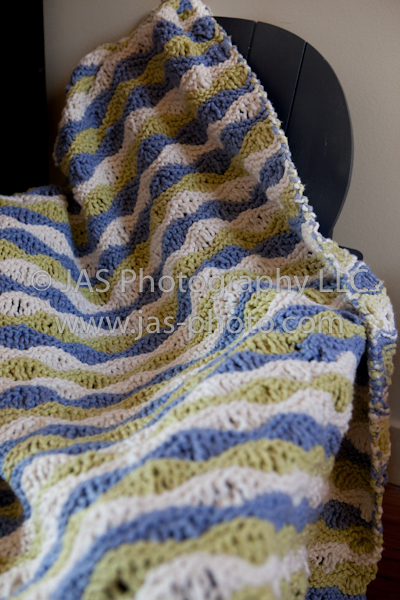
Wavy, airy, baby blanket

Radha has recently started understanding the concept that I made something for her. Well…at least she can SAY that I made something for her, I guess I don’t really know if she understands what that means =) A few months ago, I started making a baby blanket for a friend, but wasn’t able to finish it in time for her baby showre, so I made her something else instead. In the meanwhile, Radha watched me work on this blanket for a while, so I think she really understood that I was making it.
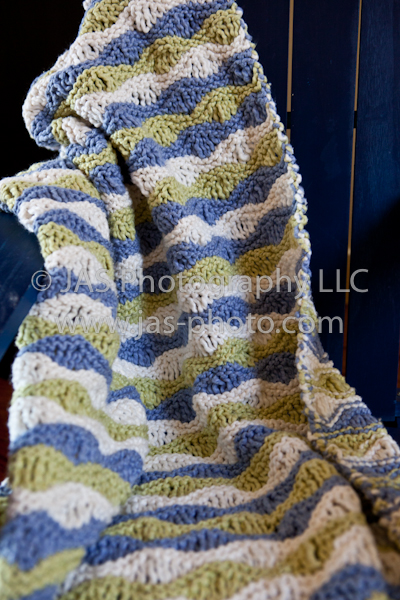
SO…I decided to finish it and keep it for her! It is made from 100% organic cotton, which I surprisingly found at Michaels! It is Lions Brand, Natural Way, and it is way more inexpensive than the other types of organic yarn that I found. They have some nice calming colors. The blanket pattern is actually very easy, and it can be found here at yet another cute craft blog called Pickles!
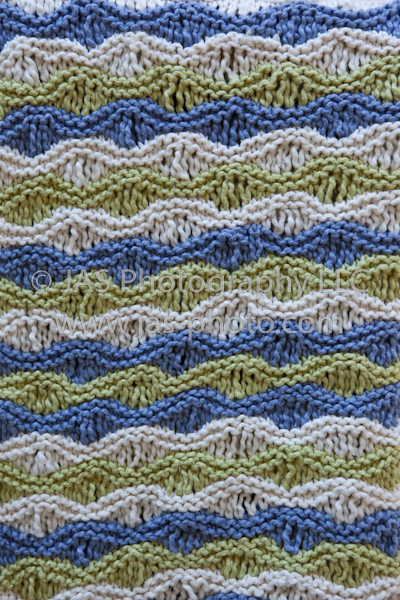
I really like the pattern that the blanket has and I also liked that you never get lost while you are making it. Once you do a few rows, you will learn to recognize what each row in the pattern looks like, so you dont get confused about what to do next!

The other thing that I like about the blanket is that it is airy. So you can use it in the early spring or fall when it is starting to get chilly, but not cold enough for a heavy wool or fleece blanket. Hopefully Radha will like it too!
Here is a word document version of the pattern for easy printing. Breezy baby blanket printable pattern
Possibilities

Sometimes pictures just leave you with a feeling. This one makes me feel 2 very different ways: 1) like there are endless [good] possibilities ahead or 2) like i’m looking up at the sky and falling! I just loved the way the clouds looked this morning. This was in the outerbanks in North Carolina (our “second home”) last summer.
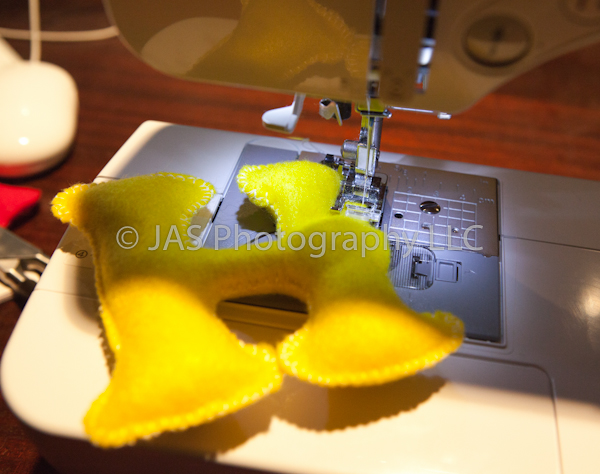
Cute felt letters
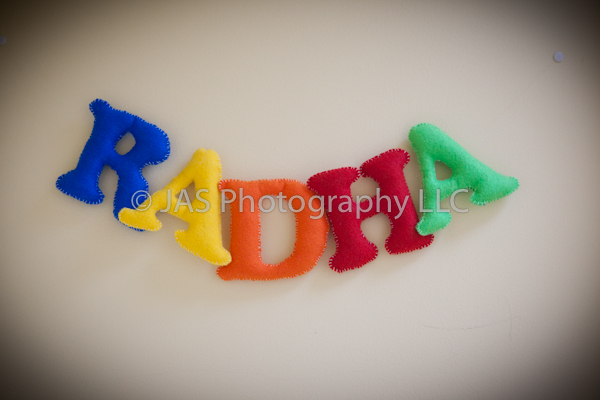
Simple. Colorful. Cute.
I have finally gotten somewhat into the 21st century and started perusing some blogs. One of my recent craft blog discoveries is a blog by this awesome mom: Rae. She made these felt letters for her daughter, which I then made for mine =) She (and I) actually made them by hand sewing – but I have since made several sets of letters for friends with my machine…it is much faster. Make sure to check out her tutorial, because it is detailed and awesome and her blog plain rocks. I’m going to quickly explain how I made mine on the machine.

Start with felt. I like all sorts of bright colors. I also just bought regular old felt sheets from my local craft store (AC Moore and Michaels).
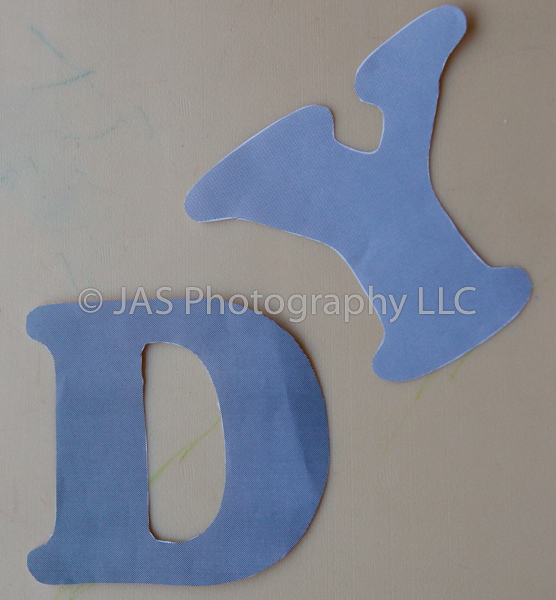
I then printed out letters. I used the Cooper Black font – which is what Rae used. You can do all capitals or capitals and lower case letters – whichever you prefer. After making several sets of these and wanting to shoot myself every time I got to the “serif” part of the letter, I would suggest using a SANserif font. It will be a lot easier.
You can either cut the letters out, and then pin them to the felt and cut out the pattern. You could also trace them onto the felt with invisible pens, and then cut out. Lastly, you could hold the felt up to the printed letter (without cutting it out) and trace the letter on with an invisible pen and then cut them out (that’s what Rae does in her tutorial). Don’t forget to fold the felt sheet in half and then cut the letters out so that you have the front and back of the letter.
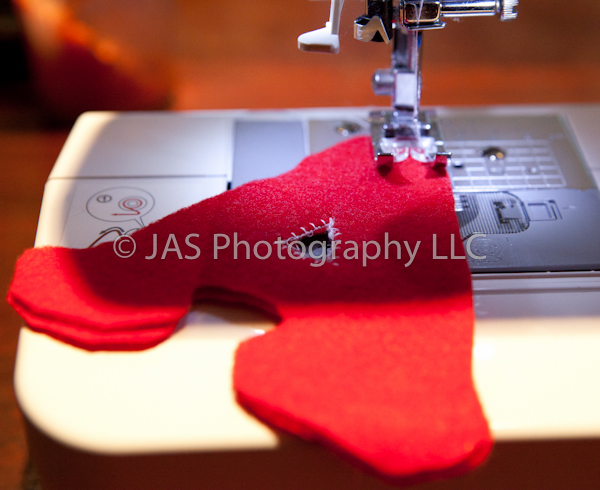
I then used a one sided stitch that is used to sew on appliques (it looks like a backwards E). For letters with holes, start with the holes first. Then, start sewing the letter from an area that would be easy to stuff. In general, I started from areas that were straight, and wider, and tried to make sure I could get to all parts of the letter from there.

Sew around the entire edge of the letter leaving an opening from which you will stuff the letter. As you can see above, I left an opening that was about 2 -3 fingers wide.
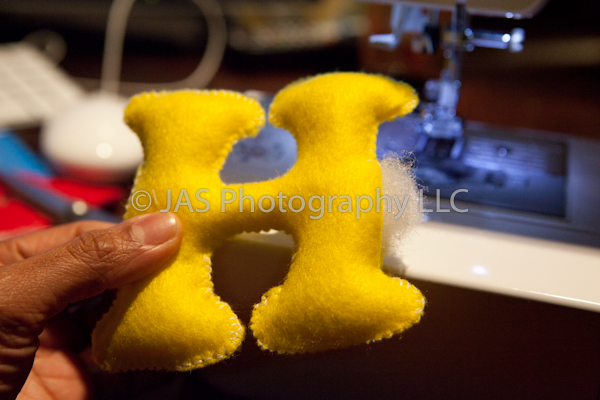
I then stuffed the letter, occasionally using a pen or marker to help shove the stuffing into other the edges.
I then closed up the opening using the machine again. I tried to push all the stuffing away from the opening, and often had to lift up the foot as far as it would go before so I could fit the letter underneath the foot. What can I say? I love sewing…but not really hand sewing…
Then I used a clear thread and tapestry needle to thread through all the letters and hung it up with with tacs.
And Voila! It’s done!
Here is a link to the original blogpost that I got the idea and directions from.
http://www.made-by-rae.com/2010/10/felt-letters-for-clementines-room.html
Spirals for spring
I found this super cute spiral lacy hat pattern online recently, and am looking forward to making it for Radha soon. Looks pretty straightforward to make and the end product is SO cute! Check out the blog post with the free pattern here. To make it, you need two sets of circular needles – one 29 inch and one 16 inch as well as double pointed needles of the same size. The author used a yarn that varies colors so you get this really cute stripe pattern with minimal work (i.e. no changing yarns!). Enjoy!


Art not so ordinary. Part 7.
Conclusion.
Today is the last day of my week of every day art. I hope you enjoyed it. =) Today’s last few pictures are profiles of my husband and eye, doing random things, where the picture gave me an overall feeling that I found interesting.
This first one is of me, standing in the doorway to an underground lounge in Anacapri, Italy where Luv and I went for our honeymoon. I really like the effect of the silhouette in this picture with the warm, sunset-like colors in the background. This picture gives me kind of a mysterious feeling, which makes me like the name of the lounge in the background even better: Underground. minimal post processing on this picture. Take on the Canon Powershot S40 almost a decade ago.

This is a picture of Luv taking a picture on the coast of California on our trip own to Monterrey. I really liked the the look of him standing tall in the foreground, with both mountains and beach in the back. Post processing: a little vignetting, decreased saturation and vibrance and increased clarity.

I can usually remember where almost every picture is taken…but not this one. I’m pretty sure it is in a random store in Westminster, MD…but not positive. Couldn’t help myself. I just really liked the casual stance taken from the back.

Art not so ordinary. Part 6.
Day 3 of my week of “everyday art.”
This was from a campfire at a birthday party a couple of years ago. I got somewhat hypnotized by the patterns the smoke was making as it rose from the fire.

The house numbers from my beloved first house. This was the week after I got my new macro lens, so I was enjoying playing around with it.

Ice in a cup. Selenium preset in lightroom. Again, my new macro lens.

Bolts from a bridge in California.

Art not so ordinary. Part 5.
Day 5. Colored patterns.
Bricks from the patio outside of Davidge Hall at the University of Maryland Medical School. I simply liked the pattern. In Lightroom, I then applied some vignetting and a cross process effect.

The side of an old building in Old City Philadelphia. Sepia filter.

This is actually sand on a beach in Goa, India. Taken on my Canon Powershot S40. The original picture is really not incredibly exciting and is somewhat washed out. But I turned up the blacks A LOT and really liked the effect it created.

This is actually a glass door at a restaurant in Philadelphia. Random. I just liked all the colored polka dots. The glass is actually see through, but there was a shadow behind it. So again, I turned up up the blacks to get this cool effect. I also slightly increased the saturation, vibrance and clarity.

This is the surface of a trampoline, taken with my iPhone. I was surprised to see how well the phone would hold up at such a close distance. I obviously couldn’t set the aperture myself, but liked the effect I got here.

