I had a tough time choosing this week’s entry for the I Heart Faces weekly photo challenge. I had several that I felt like really captured the boy’s spirits that I was photographing! This one is slightly blurry, but I actually like the effect because it gives you the feeling of his movement during the photograph. Most of all though, I just love the joy on his face!

Check out some other great entries here!

Drapes to spice up a toddler’s room
I recently posted a tutorial for making a resusable bag for a toddler, which I said was my first sewing project for which I did not use a pattern or other online help. But I realized, that there have been a couple of other projects I successfully completed before as well!

We recently moved into a new house (ok, not so recent…it was last July!) and the drapes in all the rooms are just dreadful. They were particularly bad in R’s room…as you can see below, they looked like they came from an old, cheesy motel.

Well, I have been wanting to re-do her room and make it more fun, but have been feeling overwhelmed with the project, since EVERYTHING needs to be redone, including all the paint…and some of the plaster. So, I decided to start with the drapes – since that is such a large part of the room.

As usual, this was a last minute decision. So I decided to use fabric I already had, and not stress about making it perfect. I just wanted to make something quick that would brighten up the room, and that I wouldn’t feel bad about changing later once I had my whole room “plan” laid out. (that has yet to happen, by the way) Luckily, I had just bought this cute home decor fabric on clearance from Jo-Ann’s – I think it was like $2.50 a yard!


Then I enlisted my little helper to “measure and cut” the fabric.
=0]
I didn’t have enough fabric to make the correct length of the drapes, so I used a matching solid color to make a strip in the middle.

Once everything was all cut…

…and my helper was done with her part…

I simply sewed the plain green strip to the main fabric pieces (top and bottom), and then hemmed the sides and bottom of each drape. To hem them, I just turned the edges in 1/4 inch and then again another 1/2 inch and sewed a straight stitch down each side. Like I said – I like to keep things SIMPLE. I didn’t even iron them first because I was rushing to get the sewing done before she woke up from her nap.
In R’s room, I hope to take down the existing box for the curtain attachments and put up a simple rod – but that will come later. For now, I was able to just use the existing hooks and poke them through the fabric on top. That’s it. I left the top unsewn, and finished, and it is working fine!

One adjustment I did have to make, was I bought plain white curtains from Target, hemmed them to the same length, and added those behind my homemade drapes, so that they wouldn’t be sooo see through. I also sewed a short strip of ribbon to each side of the curtains so I could tie them up and bring more light in.


R’s reaction? “OOOOH! Polka Dots!!!! I like polka dots!”
Success!

The Market Skirt by MADE

I recently made The Market Skirt by Dana from Made and totally love it.
So i thought I would share!
=P

After initially refusing to go anywhere near it, I represented it to R as a present…and now she loves it =)

No notes to go with this pattern. It works great just as it is. Just check out MADE for the instructions and make a couple yourself!

Toddler Reusable Book Store Bag Tutorial


I’m so excited to share my very first tutorial! Granted, it is not very difficult…but it is the first thing I have sewn from scratch without looking at a pattern, or even doing any research. It has taken me a while to get comfortable enough to do this, so I’m super excited that I finally did =)

You may have seen this post from a few days ago (on my other blog), about how R and L have a father-daughter thing they do and go to the bookstore together. I discovered that part of their routine is to get a plastic (ack!) bag to put R’s book in, which she then carries out to the car on her own. Being that I could not handle a wasted plastic bag each week, I decided to make her a reusable bag that she could take to the store each week. Luckily, she LOVED it! In fact, when we took it to the book store a couple of weeks ago, she stopped the cashier register on her own and said “No! No plastic!” – I almost MELTED. I did in fact tear up…pathetic, I know.

Anyways, for those of you who are beginner sewers (?sp) like me, I thought I would post how I made the bag! My very first tutorial!


I started with the Barnes and Noble bag, so that I could make sure I made the bag the correct size – i.e. big enough to hold most books, but small enough that R could hold it by the handles without it dragging on the ground.

I wanted a finished size about 11×12. So I cut 2 rectangles of fabric 12×13 inches. At this point, I contemplated making a double sided, reversible bag…but trying to figure out how it would work started making my head hurt (i’m new to all this)! So I decided to stick to a simple bag for now.
What to cut:
2 rectangles (main bag fabric) – 12 x 13 inches each
2 rectangles for straps – 2 x 11 inches each
Other stuff:
Piping & bias tape (totally optional) and of course, thread!

STEP 1 – Finish edges of fabric pieces: I started off by serging the ends of the rectangles – except the top edge which would be covered by bias tape. Instead of serging the strap sides separately, I just went ahead and folded them in half lengthwise, with right sides together, and serged them together. All of this can be done with a regular machine – just use the zig zag stitch for the edges. Although since this is a bag and is not likely to get washed all that much, it may not even be necessary to finish off the edges anyways.

STEP 2 – Sew on the piping: Take one rectangle piece, and measure and cut piping long enough to run along 3 sides of the fabric. To attach, lay the piping with its raw edge lined up with the fabric’s raw edge, on the RIGHT side of the fabric. Then sew a regular straight stitch as close to the piping edge as possible. I had difficulty with this, because as I tried to keep the stitch very close, the piping went under the pressor foot…but didn’t want to stay there.

So it kept slipping out from under the foot and I’d have to go back and re-sew those sections. Anyone with recommendations on how to handle that?? On the corners, I cut little slits into the piping to make it easier to make it follow the corner.

STEP 3 – Sew both sides of bag together: Put both rectangle pieces, right sides together, and sew them together along the same 3 edges with the piping. This is somewhat tricky, because you can’t see the piping, and have to actually feel where it is to guide yourself on where to sew. You want to sew as close to the piping as possible. You also want to sew closer to the piping than stitch from step 2 so that seam won’t show in the end. It helps to turn the fabric pieces over so that you are looking at the wrong sie of the fabric that you sewed the piping onto. Then you can see your previous seam line and make sure you sew closer to the piping than that line. There were some areas where I ended up sewing ON the piping…but in the end, I found that looked better than sewing too far away from the piping. Turn the fabric right side out and press.

STEP 4 – Finish the top of the bag: I sewed double folded bias tape onto the top of the bag to finish it. I basically just started from one side and sewed it all the way around to meet with the beginning. If you don’t have (or don’t want to use) bias tape, then you could just fold the top over 1/4 inch and then again another 1/2 inch and hem it in place. I would actually do that before putting the piping on or sewing the two sides together.
That’s it! The main part of the bag is done!
Now to the straps…

STEP 5 – Turn straps right side out: Using a pencil/pen/paintbrush/turning tool, turn the straps right side out (after you serge/sew the long sides together). Then iron the straps in half with the seam on a flat edge.

STEP 6 – Sew the straps: You can use matching or contrasting color thread and sew two seams down the sides of the straps. For fun, you could use a zig zag stitch down the middle or something else fun and random!

STEP 7 – Attach straps to bag: Pin the straps to the bag. You can adjust how wide you place the straps based on how long you want the bag to be. Once you have them pinned in place, sew a square and X to secure the strap into place.

That’s it! You’re done!

Now give it to your little one and watch them strut around =)

Then give them a little lesson on saving plastic and recycling!
=0]

Maybe a trip to the bookstore with the new bag would be fun too…

Daily Glimpse #19
Mom and I took R to the zoo today. She had loads of fun. This was her enjoying the big stone elephant [they had to move the big ones to a zoo with a bigger and better elephant habitat… =( ]

Daily Glimpse #18

Today’s pic. I liked the way the sun was hitting these spores (?). Unfortunately by the time I got my 70-200 lens on my camera much of the sun had faded … but you can kind of get the idea.

Versatile Blogger Award
One of my new blog-o-sphere friends, Dacia from thirtythreeandcounting, recently received the Versatile Blogger award – and she totally deserves it! She posts about all sorts of things – from weight loss, to inspiration, to philosophy, crafts and more. She puts a lot of thought into her posts and they are always a pleasure to read! Well, as part of receiving the award, recipients name several other bloggers to receive the award, and she most graciously named me as one of them! It was so nice to see it waiting for me in my email =) – especially since I am new to the blogging world…wait a minute, its been almost 5-6 months now! I guess that is pretty long…

Anyways, thanks Dacia for the kind words about my blogs and for the award!
So as part of the award, I would like to award the following 5 blogs the Versatile Blogging award as well (there are several others I would have included, but I they have already received it at least once if not more!)
…in no particular order…
1) MELISSA NOT DUSTING: http://melissakoski.wordpress.com/
2) I MADE YOU A MIX TAPE: http://sayitwithmusic.wordpress.com
3) COFFEE GROUNDS TO GROUND: http://groundtoground.org/
4) SUMPIX: http://sumpix.wordpress.com
5) Tinkerbelle86’s Blog: http://tinkerbelle86.wordpress.com/
And for the last part of the award: a few facts about myself:
1) I am a hospitalist (or internal medicine doc) by training…and work doing that part time
2) After having my daughter 2.5 years ago, I have yearned to have more of my life occupied by my family and daughter than work, ad have since started working only part time…and i LOVE it
3) I have a new found love and obsession with crafts…it is getting quite expensive
4) I have fallen asleep while standing, while talking face-to-face to a person and even while eating with my fork in mid-air. =)
Daily glimpse #17
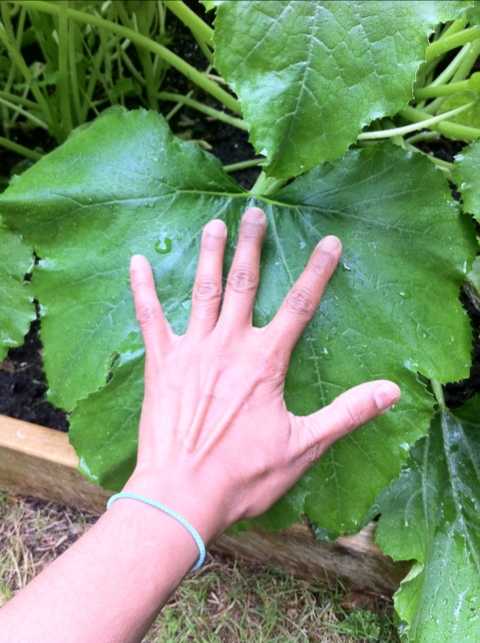
our HUGE zucchini leaves! I definitely underestimated how big these plants would get (that’s what I get for not heeding my mother-in-law’s warnings!). So now they are taking over. We even had to move the japanese eggplants that were next to them because they were being completely covered by the leaves and getting no sun! I need to buy a trellis to keep them away from the other plants..hopefully tomorrow!
Daily glimpse #16

Daily Glimpse #15

grandparents and grandchild
playing in the sun
doesn’t get better than that!
=)
