Friday Freebie – Halloween Cupcake Toppers!
This week’s freebie is inspired by all the amazingly cute halloween designs I have seen online lately.
Just some simple cupcake toppers to spruce up some cupcakes! Have fun!
(and as always, please remember that this file is for personal use only)

Click on this image to download the PDF for printing. You can also right click and choose "save link as..."
Enjoy!
The perfect school/day care sleeping bag

This year I needed to get R a sleeping bag for her naps at school. I looked everywhere, but all I could find were really big sleeping bags that would swallow her up! THEN I found that if I searched online (I used amazon) under “NAP MAT” instead of “sleeping bag,” I found a TON of other cute options!

‘
‘
The cool thing about these naps mats is that they have a built in pillow and blanket, all into one connected piece. Plus, the entire thing rolls up unto an easy to carry roll with a handle! It is great.
‘
‘
‘
Not to mention…R LOVES it!
‘
Just thought I’d share since a lot of us moms and dads were stumped as to where to buy a good nap time sleeping bag for our kiddos!
‘
‘
Happy Napping!
‘
Weekly Photo Challenge: Sunset
Phew! It sure has been a while since I have posted anything! I was working last week then out of town this past weekend…so of course, I fell behind. I’m working again next week…so will probably be more of the same.
BUT – I do want to contribute to this week’s photo challenge at The Daily Post: SUNSET.
These pictures were taken this april when L and went to Italy. We were sitting on the steps of Piazza di Michelangelo, drinking wine and eating truffled cheese, while we watched the sunset over the river. We were in heaven!
‘
‘
‘
‘
‘
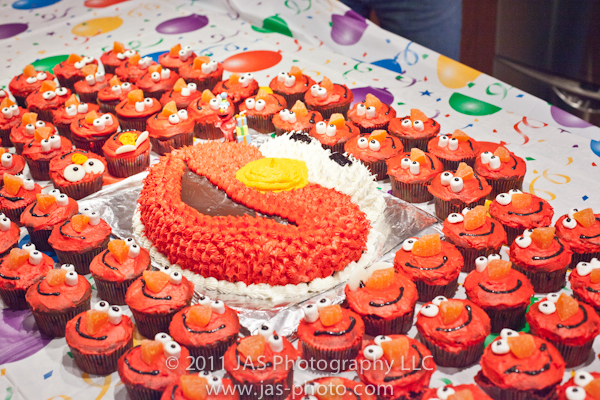
Weekly photo challenge: Faces
As soon as I saw this week’s photo challenge, this is the imae that popped into my head. Not exactly the most interesting from a photogaphy perspective, but I couldn’t help it. I kept coming back to this image so figured I’d post it! These are the cupcakes and the cake I made for R’s 2nd birthday party!
Friday freebie – Coffee labels

I don’t know about you, but we often have many different types of coffee in our house – coffee, espresso, decaf, regular etc…
And more often than not, I lose track of what is what!
SOOO….I made some cute coffee labels to put on my different containers so that I can keep track! I made labels in 2 different sizes – small ones for the top, and larger ones for the sides.

These are great for those disposable containers that you may (hopefully!) re-use and also for your not-so-disposable containers.


So here they are for you:

Click on the image to download your free PDF

Click on image to download the free PDF!
These are formatted to be printed on a US Letter (8.5×11) size paper. Both sizes allow for a border – so you don’t need a fancy printer. I would recommend getting label paper from your nearest office supply store (or buy in bulk at Planet Label like me!) and then use a paper cutter to cut them!

I have a few small containers I bought from the dollar store a while back which turned out to be perfect for storing the labels in!
Enjoy!
TUTORIAL: Kids Ikea Poang Slipcover
So we recently bought this Poang chair from IKEA, for R. We have one each for L and I in our bedrooms, so she got a kick out of having the same chair!
Unfortunately, the chair for kids is not very stylish! Unlike the big people chairs that come with lots of fabric options, the toddler chair comes with just this plain off-white option.
SOOOOOOO……I decided to turn THIS:

…into THIS!

And that gave me a really happy face!

And lots of hugs!

Pretty cool right?

And I did it all in about 3 hours. So not that bad!

Wanna make one?
Here’s the tute…

..

Alright, so start with figuring out what fabric you want to use. You need a front and back fabric, but the back fabric is essentially not seen once the cushion is on the chair. I went with this super cute robot fabric which is 100% cotton and kind of thicker than normal, so that it would stand up to some rough play.

So this is me measuring….luckily you don’t have to do this part since I already did!

These are the fabric pieces you need:
1 Front & 1 back fabric: 16.25 x 35 inches each
Note: I forgot to account for how I was going to get the cushion into the slipcover, and halfway through putting this together added a zipper to the bottom of the cover. It works, but is not the cutest. I am going to work on making another one that has a flap like a pillow sham and will put the measurements for that up once I have them.

There is a top and bottom flap that are used to hook the cushion onto the chair base. These two pieces are trapezoids as you can see in the picture below. The original cushion has velcro along the bottom flap – I did not do this, and it works just fine without it.
This diagram shows the measurements for the flap pieces (in inches).

Note: ALL seam allowances are 1/2 inch.

Once you have cut out the flap pieces, hem the longest edge an inch. You can either serge the edge then fold over an inch and sew in place, or you can fold down 1/4 inch and then another 1 inch and sew the edge.

Next, you want to lay all the fabric pieces together and pin in place.
First put the back fabric, right side UP.

On top of that, put the top flap and bottom flap with the 16.25 inch edge along the top and bottom edge of the back piece.

..

Next put the FRONT fabric on top of it all, with the right side DOWN and pin in place.
This picture below is with the whole thing turned upside down. I cut my front fabric piece too large, so i wanted that on the bottom when I was pinning.

Then you want to sew around 3 edges: the sides and top.
As you can see below, you want to sew along the dotted edge. Note you need to leave a couple of inches on the bottom edge of the sides UNsewn so you can get the zipper in.

Note: unlike in my picture below, your fabric will all match up – my front piece is too big, which is why it is sticking out from the edges of the rest of my fabric.

Then you need to add the zipper. If you already know how to add a zipper, great!
Otherwise I will try to describe what I did…sorry I don’t have pictures of this part. I got carried away trying to make it work and forgot to take the pix!
Adding the zipper:
I used a 14 inch zipper, and I used one that could be taken apart and put back together. Since it could be taken apart, I separated the sides, and sewed one to each side of the bottom edge of the slip cover. I started with lining up the raw edges of the zipper and one side of the fabric, with right sides together and sewed near the edge. Then I flipped the fabric over, and top stitched it into place to make a nice edge near the zipper. Then I did the same for the other half of the zipper and the other fabric (i.e. one on the front fabric and one on the back fabric – both on the bottom edge of the slip cover).
Then, keeping the whole cover inside out, sew from the open edges to the zipper on each side. On the side of the zipper that gets reattached, leave an inch unsewn so that you have some give in the fabric to reattach the zipper. You can either leave this unsewn, or you can reattach the zipper, move the zipper handle in the middle of the zipper and then sew that last inch closed as best as you can. It may be difficult because the zipper will be bulky.
But that’s it! Once you have that done, clip the corners of the fabric, and then turn the cover right side out. You can use a chopstick or pen/pencil to poke the corners out.
Then put your cushion in!

It is a snug fit, but that way it sits better on the chair. I found the best way to get the cushion in was to fold it in half, then put the cushion in. Once it is all the way in, unfold it and spread it out. Just make sure you put the pillow side in first so that the zipper ends up at the bottom.

Then you can slip the top and bottom flaps onto the chair base, and you are done!

Now let your little one enjoy!!

Not bad right? The whole thing shouldn’t take very long – the zipper is the most time consuming part =)

The chair looks cute from the back too!

..

..

Enjoy!
And if you have any other ideas for how to close the slip cover without a zipper, please leave comment!

IHeartFaces Weekly Photo Challenge: A touch of SUN
I love this picture beacuse it was the dead of winter, but the sun finally peeked through the clouds for a few hours, during which we ran outside to enjoy it. R had a blast blowing bubbles and and looked cute too!

Check out other great entries here!

My Mugs!
I posted a while back about how painting pottery is a great activity for kid and the whole family! Well, when we did this, it was when we were out of town in Houston, so I couldn’t bring our finished pieces back with us…but now I have them!
So I thought I would share:

This AMAZING first mug was made by the one and only R (with her daddy’s help…)

Isn’t it beautiful!?


And this second cup us mine =)

Inspired by all the amazing poppies we saw in Italy


I am loving drinking my coffee in them!

So check out a place near you and make some fun pottery for your house!

Friday Freebie
Today’s freebie is different than the last two. A little abstract picture of a food cart in Firenze, Italy from a few years ago.
Enjoy!
A picture for you to enjoy for your personal use – for a screensaver, your phone, your desktop and more!
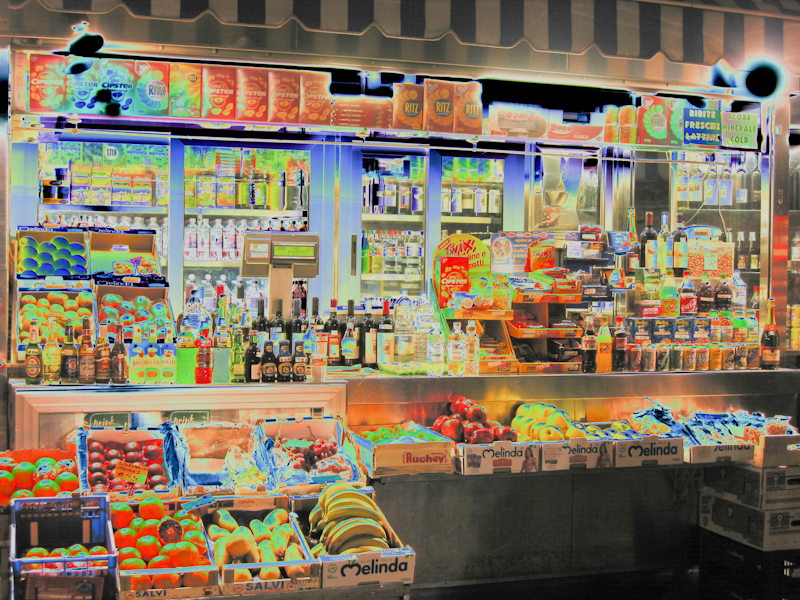
Please note: This picture is copyright protected 2011 JAS Photography LLC, you may use it royalty free for personal applications. It is not for commercial use. Thanks!


