Photo Tip & Friday Freebie/Tutorial: Clipping Masks & Free Photoshop Album Template Download
Well, after 6 days of spending all day on it, I have FINALLY finished my 2011 Family Album!
I can’t wait to get the finished result and will definitely show pics once I do.
Here is the cover:
And a sample of one of the pages:
I decided to go with blurb.com for publishing the book. They seem to have good printing, I was able to upgrade my page quality to a matte/lustre finish which I like better than the standard paper, and it looks pretty professional. Another cool perk is that for $2, I was able to instantly download an epub version of the book to my ipad! It is especially cool because I could send the link to my family and they are able to download it as well – so everyone can enjoy the album!
So, how did I make the album?
Here is where the Friday Freebie comes in: I used photoshop to make templates and then used the clipping mask feature.
What in the world is a “clipping mask” you ask?
Photoshop works with layers. The cliipping mask feature works with those layers – you create clipping mask of one layer (the upper layer) to another (the layer immediately below it).
What it does, hides all parts of the upper layer, except that which matches to whatever is on the lower layer.
Ok, a little confusing…let me show you some pix.
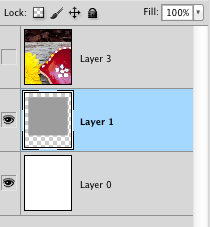
In the picture below, you see an image in photoshop with 2 layers: the bottom layer is the plain white background. The layer above it has the gray square, and the rest of it is transparent.
In this picture you can see the layers.
What I want to do, is insert my picture (layer 3) that you see below, but make it show up only where the gray square is.
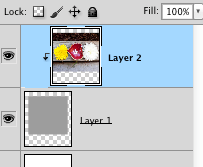
When you make a clipping mask from layer 3 to layer 2, the only part of layer 3 that will show is whatever is OVER the gray box on layer two. It doesn’t matter what color the shape is on the lower layer – it just looks for any non-transparent pixels, and shows that part of the upper layer.
As you can see in this picture, if I show layer 3, it takes up a lot of the canvas, and is not fitting into the gray box.
If you right click on layer 3 (the one with the picture), you get this menu:
and you choose clipping mask. Or, the faster way, is to use the keyboard shortcut: alt/option + command + G
That will clip the layer you are on, to the one below, and your layers panel will look like this (you see the layer thumbnail indented to the right with a little arrow pointing down) :
and now our image looks like this:
That’s it! Once you have clipped the layer, you can resize the layer with the picture on it to make it fit into your clipped section better. To do this, I use the free transform option (command + T, or you can go to Edit -> Free Transform) and resize it however you want. If you hold down the shift key while you resize your picture from the corner, it will keep it’s original proportions.
That’s it! That’s how I made my whole album! I first downloaded (bought) a few templates from Album Cafe, and then once I understood the process better, I made my own templates.
So the freebie for today, is the following template:
Right-click on the image above to download the PSD (photoshop) file to make this page.
So to recap how to use it:
1) Open the file in photoshop
2) Bring pictures into photoshop that you want to put on the page. Make sure that whatever picture you want to correspond to the appropriate picture holder, is immediately above that layer.
3) Once you have the picture layer above the shape layer where you want it to show up, use the clipping mask feature (right click on the layer and choose “create clipping mask” or press alt/option + command + G). To try to make this easier, I have numbered the different picture holders and matched that to the layer number.
4) Then use the free transform feature (command + T) to move and resize the picture however you want it to look on the page. Make sure that when you use free transform, you have the picture layer selected that you want to edit.
If you have any questions or it isn’t working, feel free to ask!
Hope you enjoy!


